Multiselect dropdowns are very important components in any webapps.
They enable your users to make a list of selection, that can then be used for a wide array of purposes (filters, actions on a list etc...).
But in Bubble, there a few ways you can achieve this.
In this article, we are going to create multiselect dropdowns in Bubble in two ways :
1. With the use of a free plugin
2. By making our own multiselect dropdown, without any plugin
Why those two approaches ?
Well, the first one will be a great option for most cases. It's fast, free and it works quite well out of the box.
But it lacks flexibility. You won't be able to entirely customize its design.
This is why this article will also present a second approach, that requires a bit more time and energy, but comes with the advantage to be entirely customizable.
To go further, you can also read our article on how to create a custom dropdown in Bubble.
Approach 1 : Creating our multiselect dropdown in Bubble.io with a plugin
Installing the multiselect dropdown plugin by Bubble
Let's get started with the first approach.
The first thing you'll need to do is to install a plugin that will create the multislect dropdown for us.
There are many plugins that can be free or paid, but in this article, we'll use the one made by Bubble themselves.
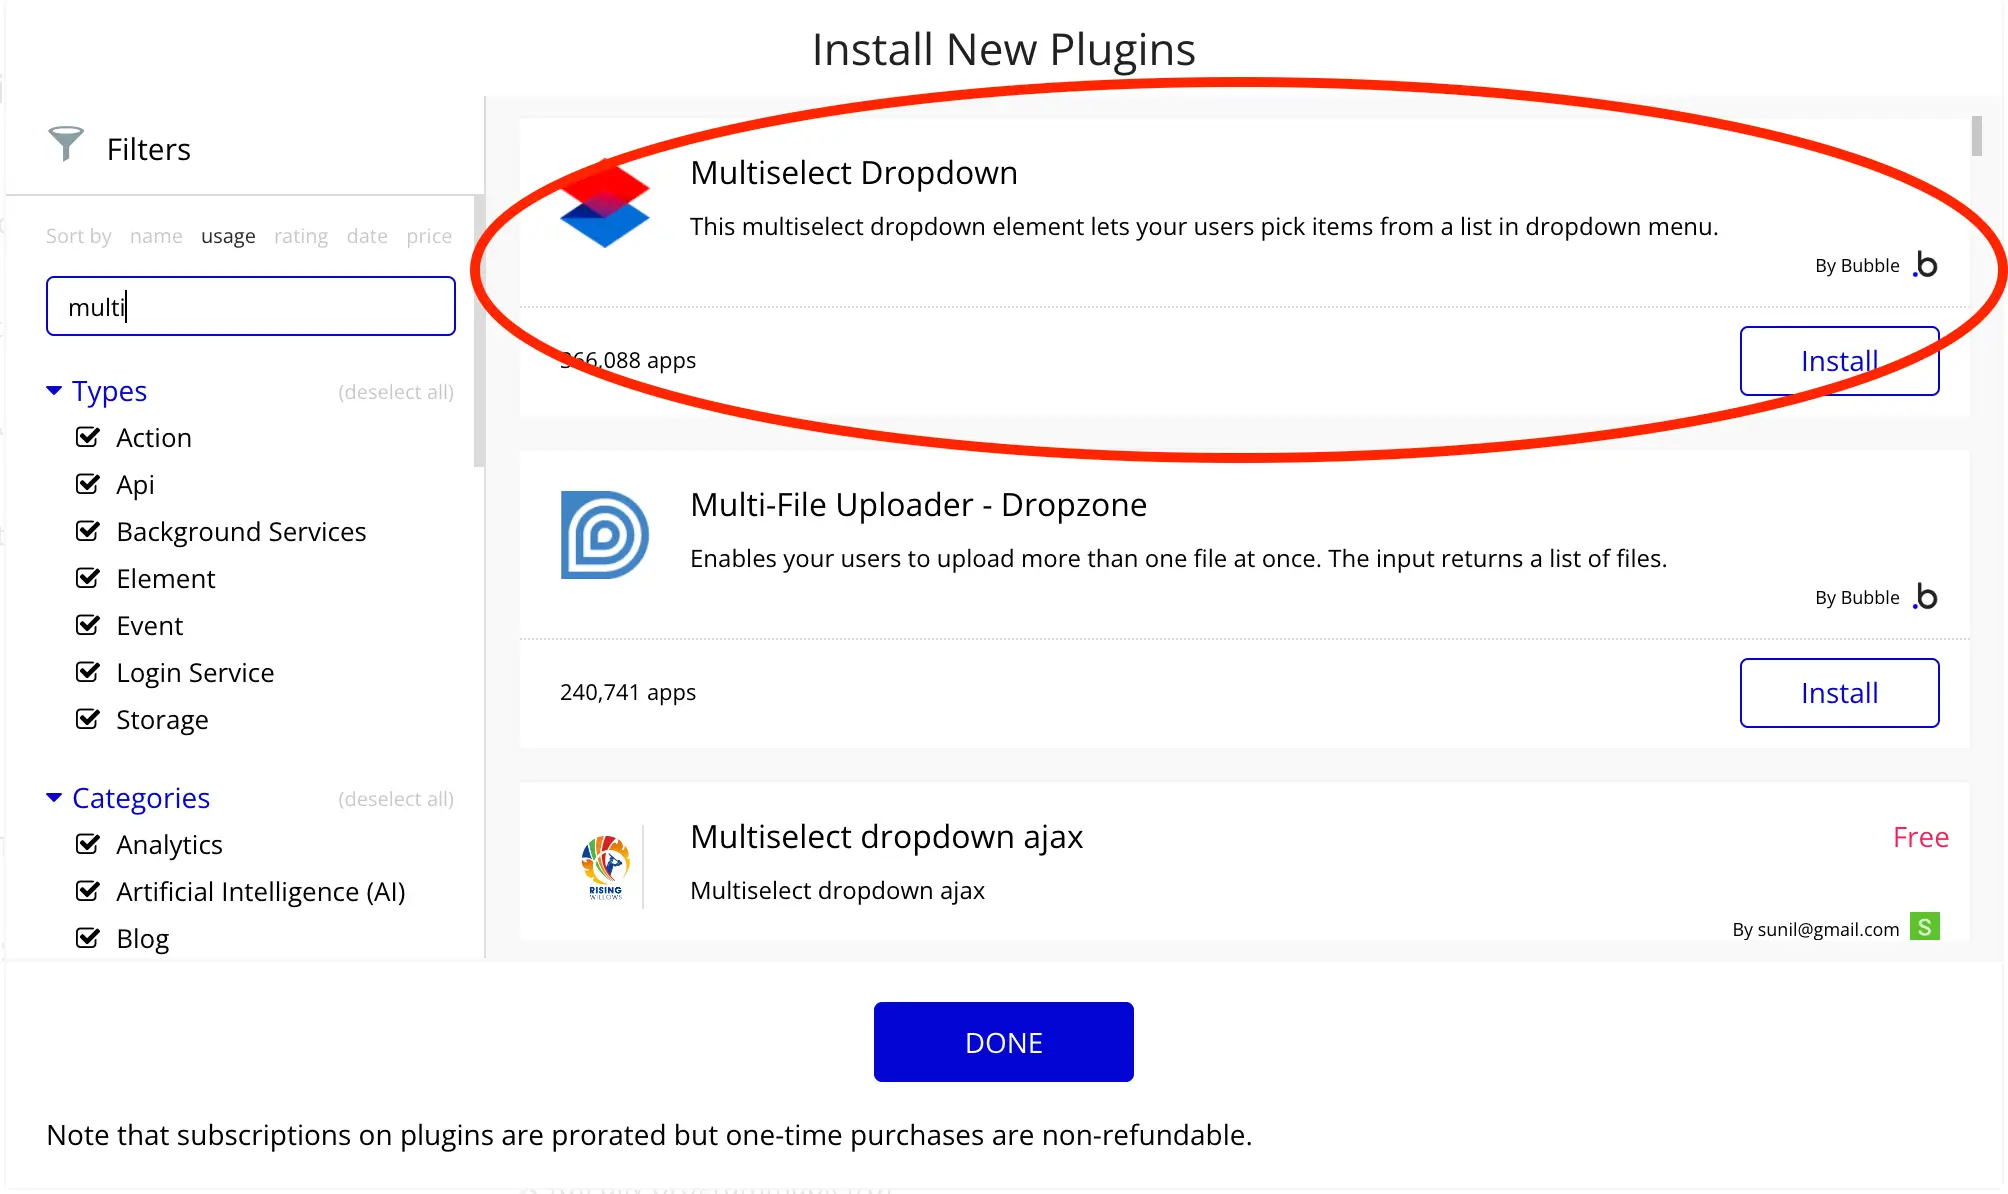
It doesn't have an official plugin page, so you'll have to search for it directly from your Bubble.io application.
Adding our multiselect dropdown to our page
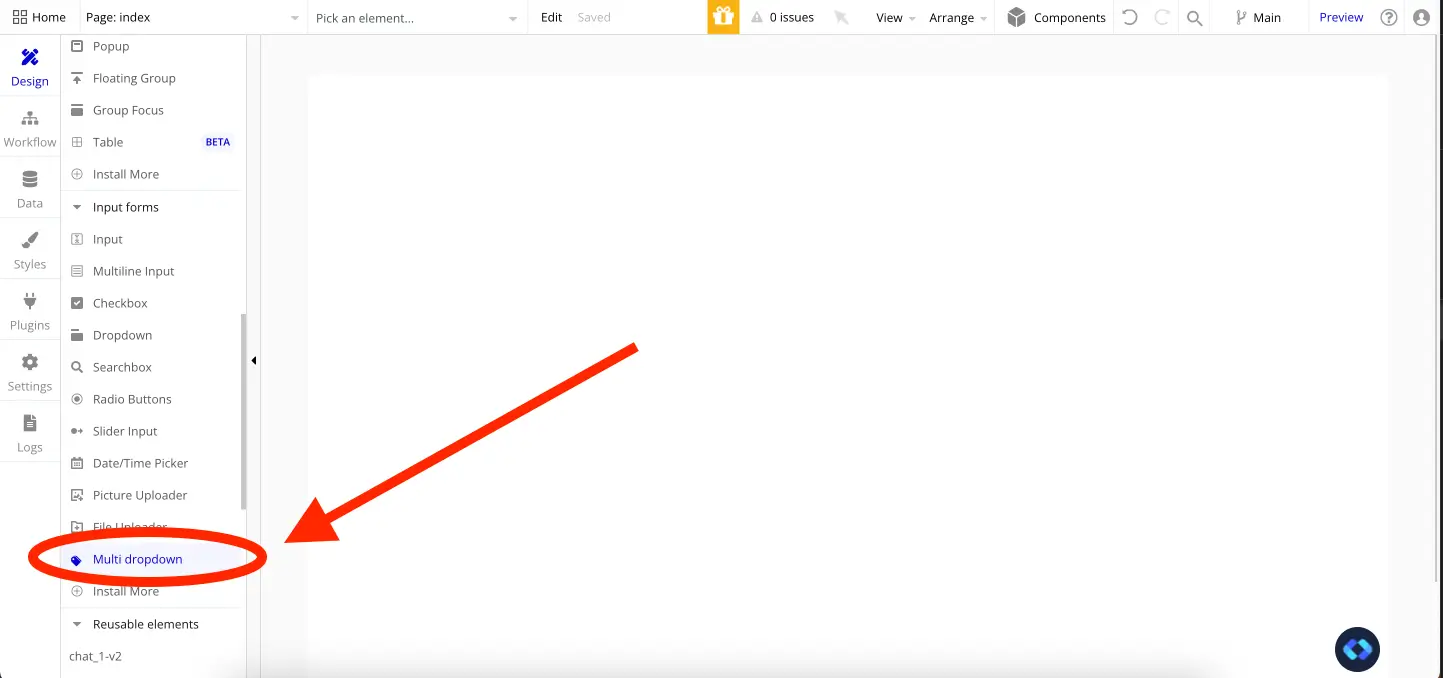
Now that you've installed the plugin, you can go ahead and add the dropdown to your Bubble.io page.
Designing our multiselect dropdown element
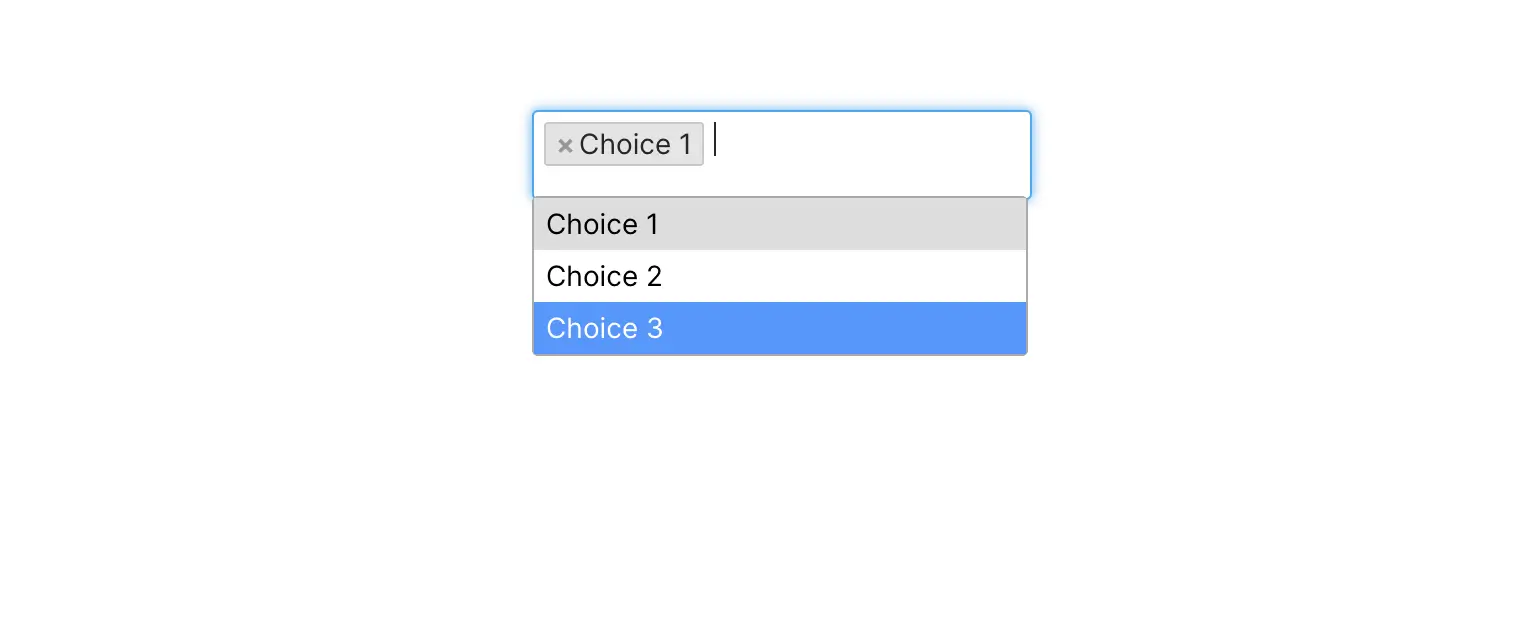
Once added to your page, you will see in terms of formatting and styling, it looks pretty much the same as any other input elements in Bubble.
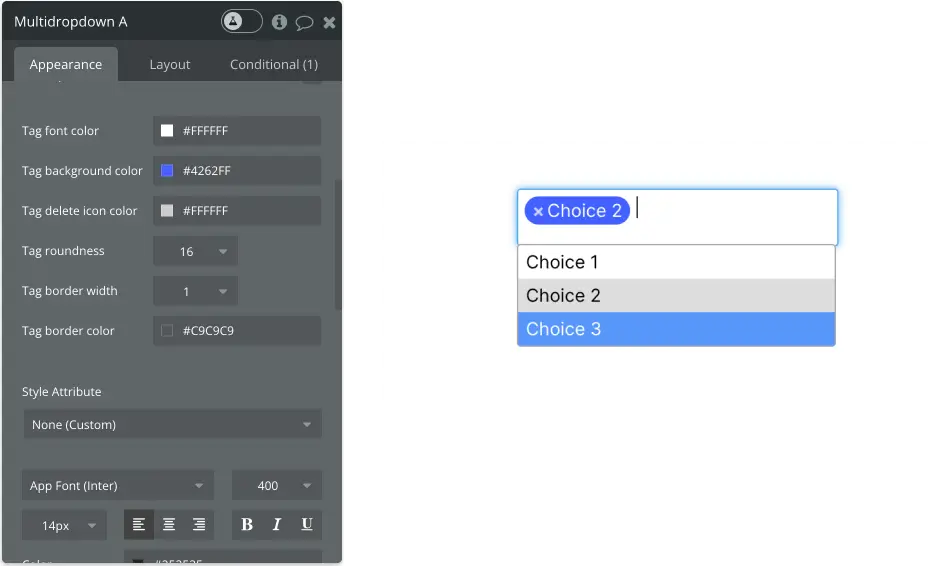
However, you'l see a new section that will enable you to customize the Tag properties.
The "tag" is the elements that is used to display the values that have been selected in your multiselect dropdown.
So go ahead, play with the values and try to find the best looking ones that fit your app's design !
Personally, I came up with this :
Setting our multiselect dropdown's choices source
Now that the design of our element has been taken care of, we still need to make sure we feed the right data into it.
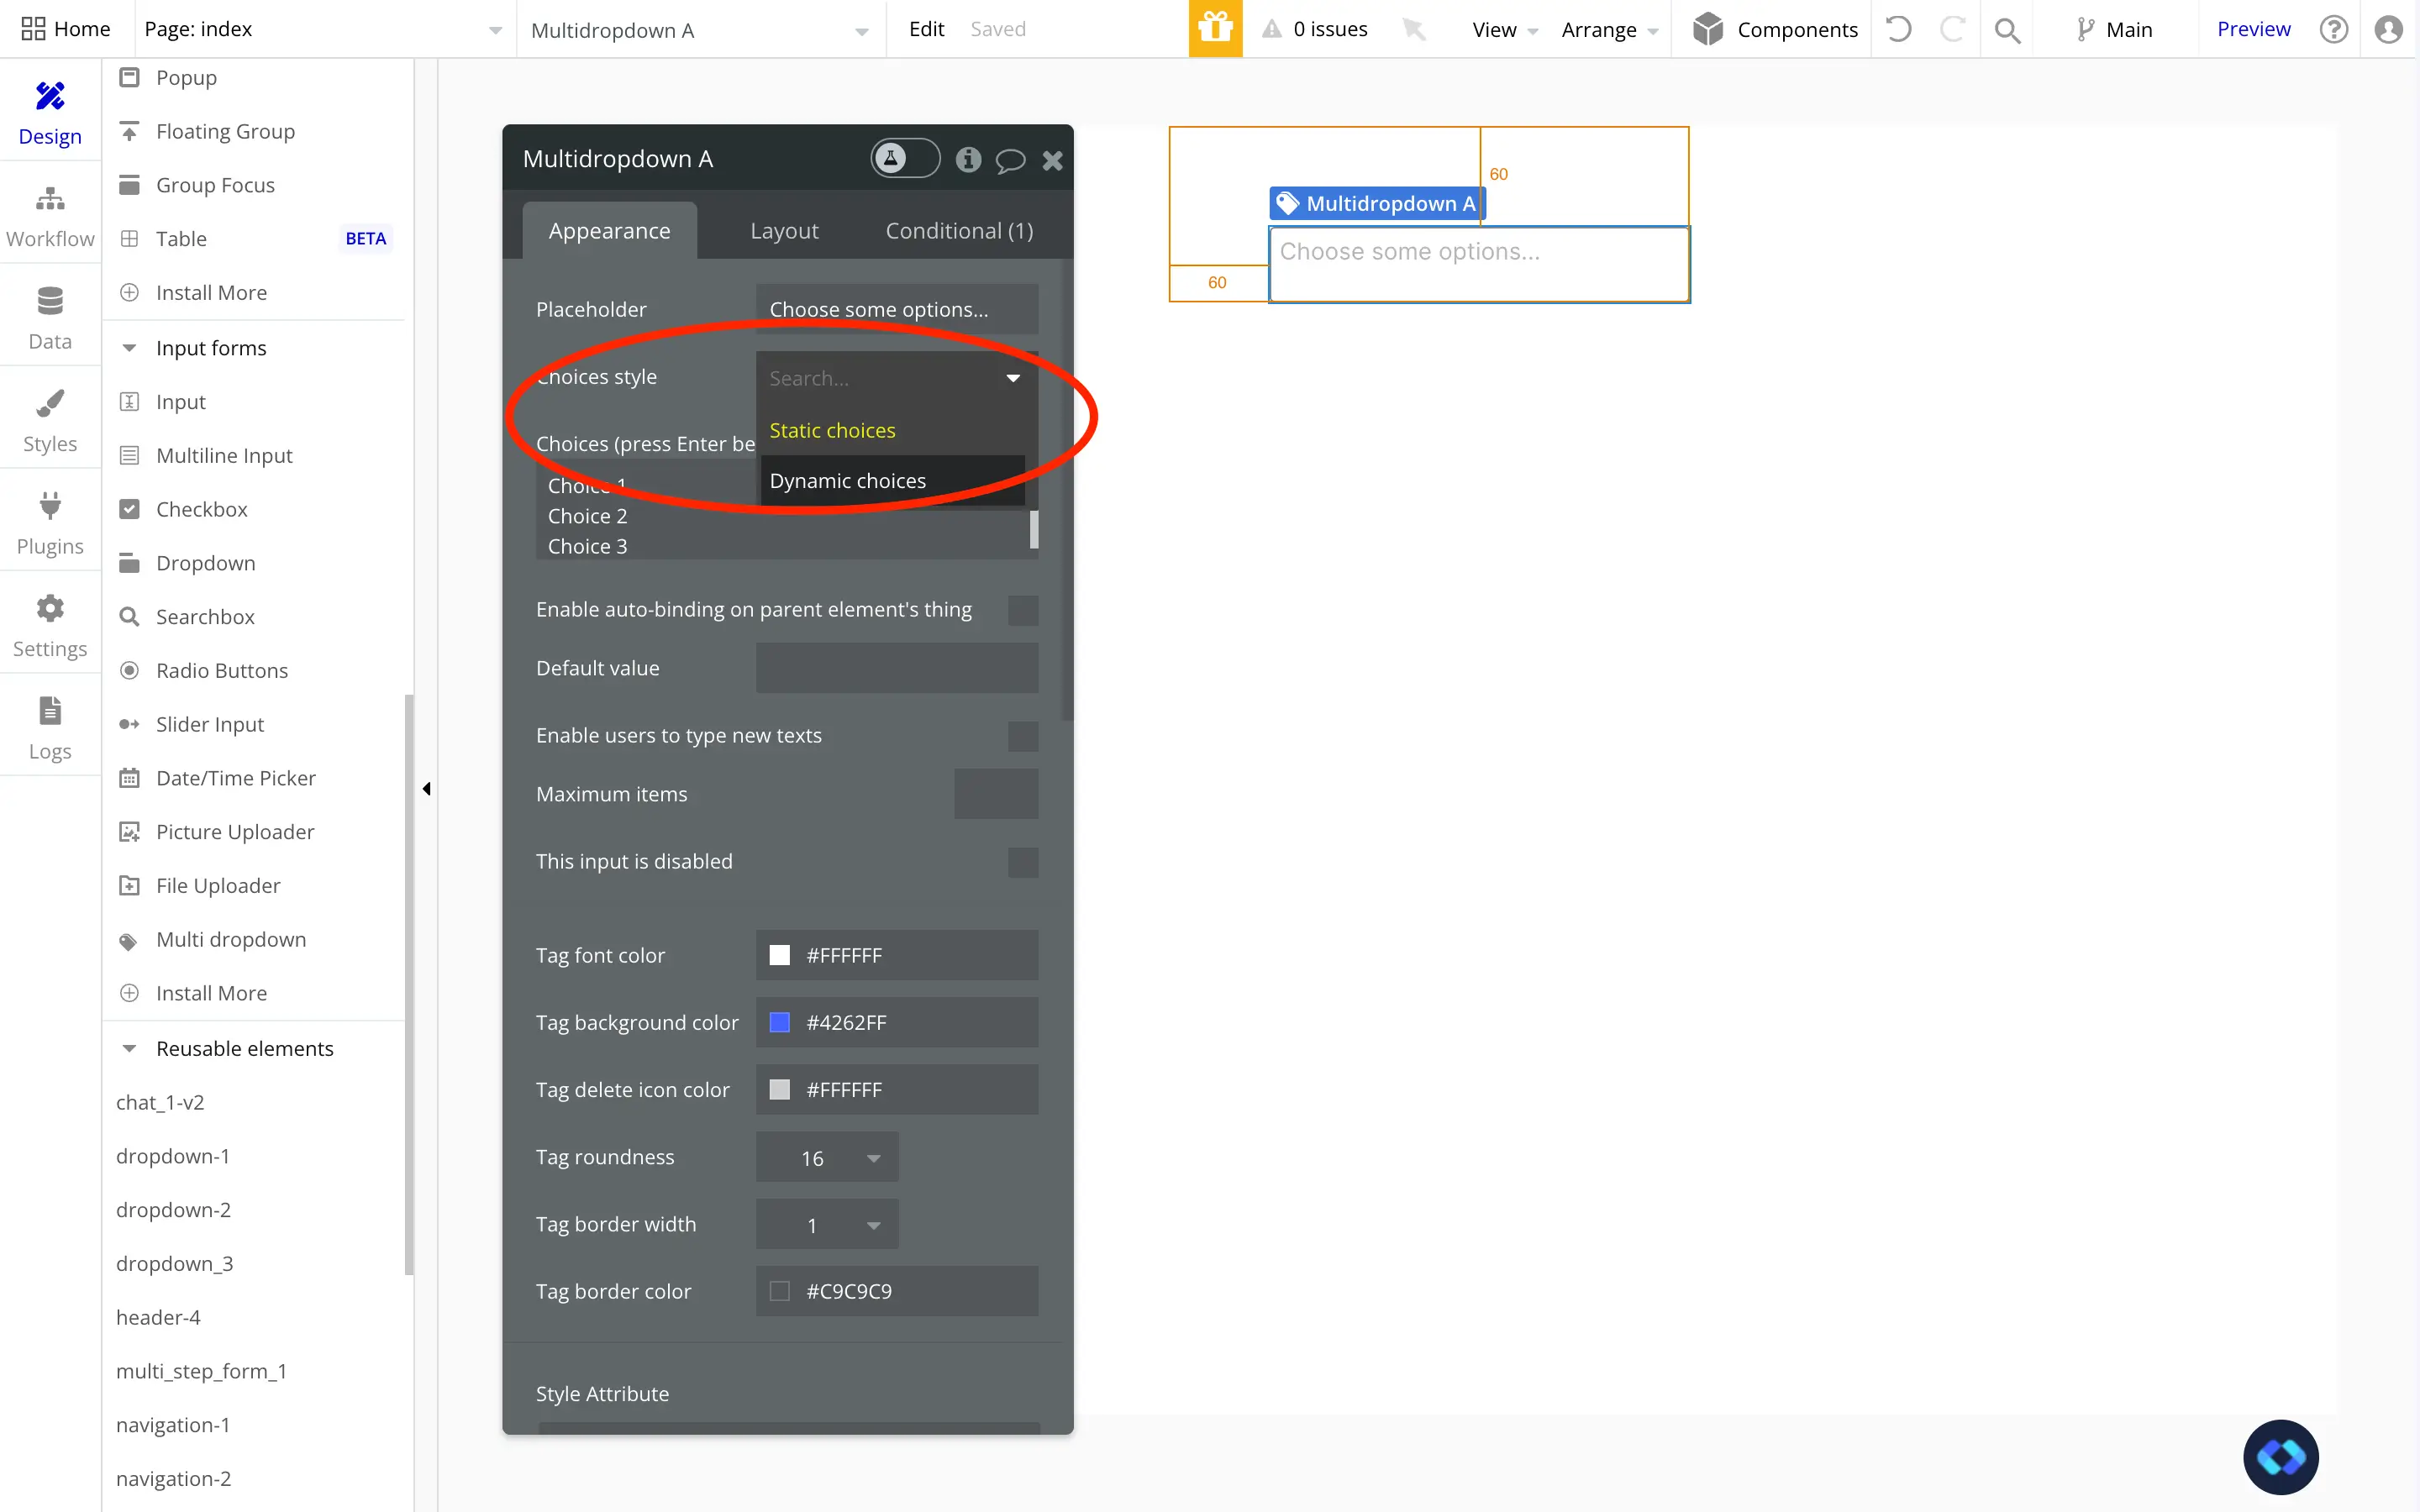
To do this, we'll need to go back to our dropdown's property panel, and set it's "Choices style" property to "Dynamic Choices"
This will enable us to send Dynamic data into it, such as a list of Users or Cities for example !
Now, that it's done you'll need to :
Set the "Type of Choices" that you will display. This is the Data Types of your choices. For example, if you want to display of list of Users, you will select User at the Type of Choices.
Set the "Choices source" of your dropdown. If you are familiar with Repeating Groups, this is the same approach. Simply use a "Do a Search for" to find the data you're looking for (or "Get and Option" if you want to display an option set)
Set the "Option caption". This will be the text display within the dropdown. For example, if you are displaying a list of Users, you might to display their Name as the caption.
In the example below, I am displaying a List of Components (that I'm getting from Nocodable Component's database).
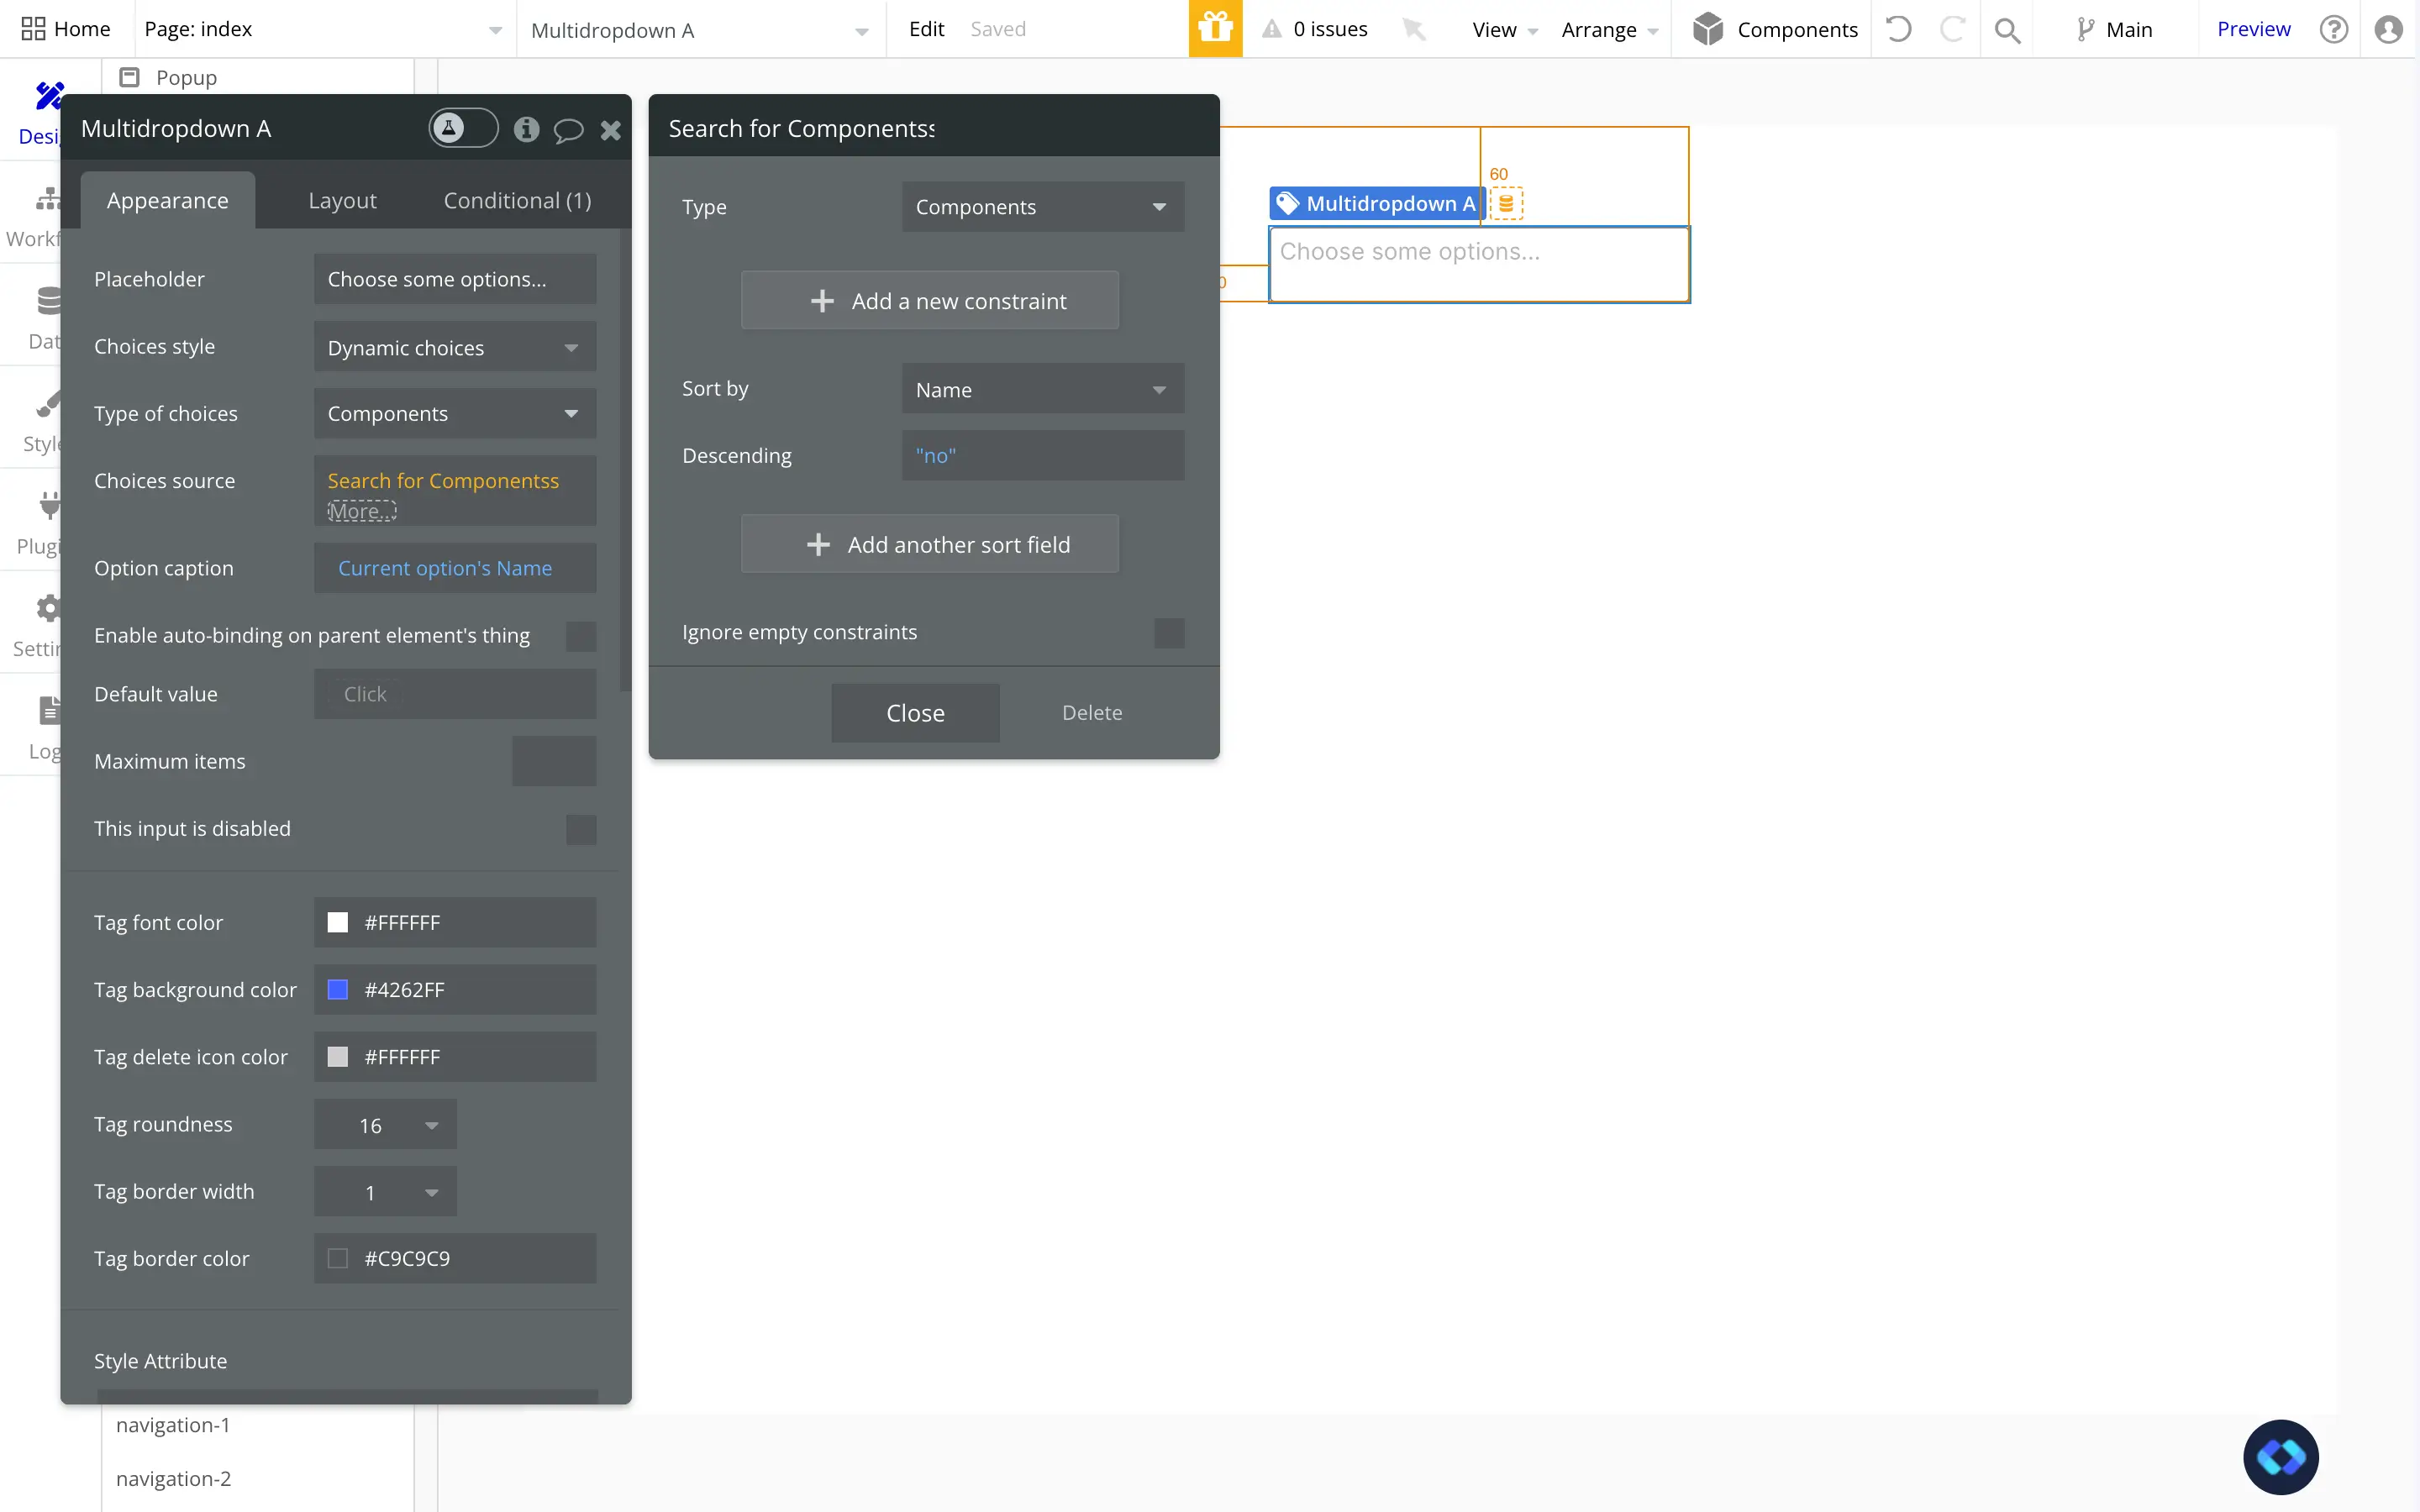
As you can see, I'm pulling my Data with a "Do a Search for", and I'm using the Name of my components as the caption.
And there you go, you have a ready to use Multiselect dropdown element for your Bubble.io app.
And for most cases, this is perfect and will do the job perfectly.
However, for some specific use cases, this dropdown will be slightly limited, which is why we are going to see another way of building of customized multiselect dropdown in the next part.
Approach 2 : Building our Multiselect dropdown from scratch
In this part, we are going to see how you can build a more advanced and personalizable multiselect dropdown.
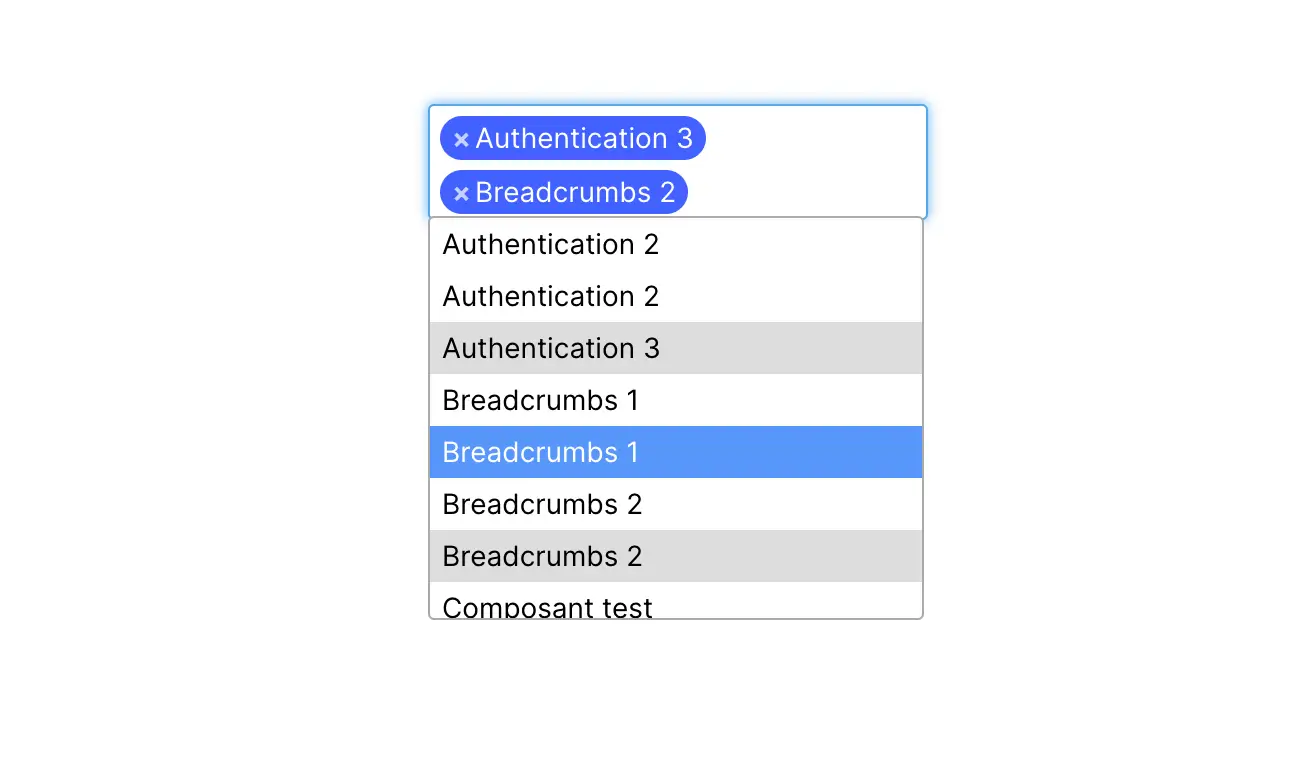
With it, you'll be able to insert images in the choice, add a command menu, custom checkboxes and many more things.
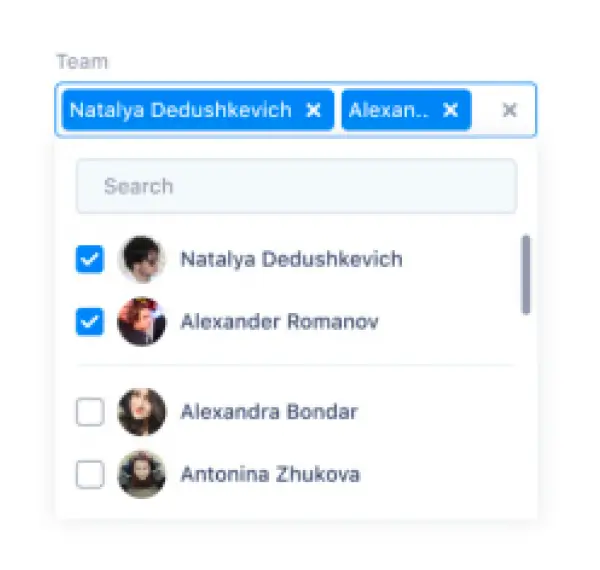
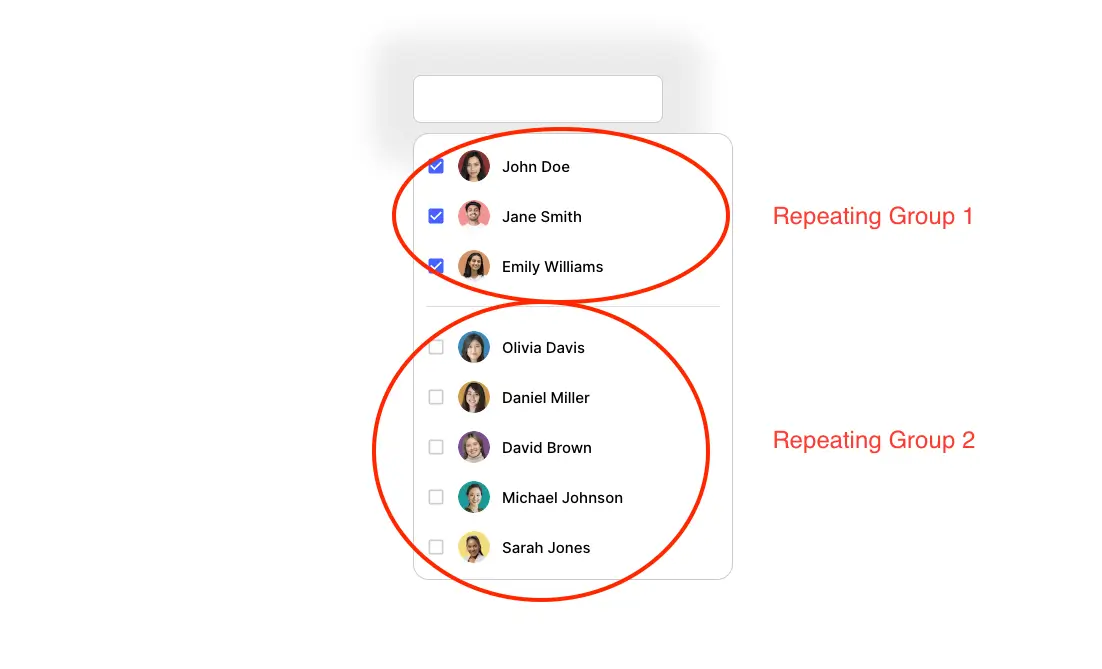
As you can see in the screenshot above, this dropdown is more advanced.
It has a search bar, the list of selected users is separated from the non-selected ones, and the tag are added above as well.
Let's face it, this looks way better than the first one we've built, and it is way better in User Experience.
To realize it, we are going to need several vanilla Bubble elements :
3 Repeating Groups : 1 will display the tags, 1 will display the list of selected users and the last one will display the list of non-selected users
Custom states : we'll use it to store the list of selected users
Focus Group : This will contain our searchbar and the repeating groups displaying the users
Some workflows
Step 1 : Designing our Group Focus
Our first step will be to design our Focus Group.
This is the element that contains our Users List, and that will appear when our dropdown is being clicked !
I wont spend too much time on building the UI of this group in itself, because that is not what the articles is about, but here is how it's built :
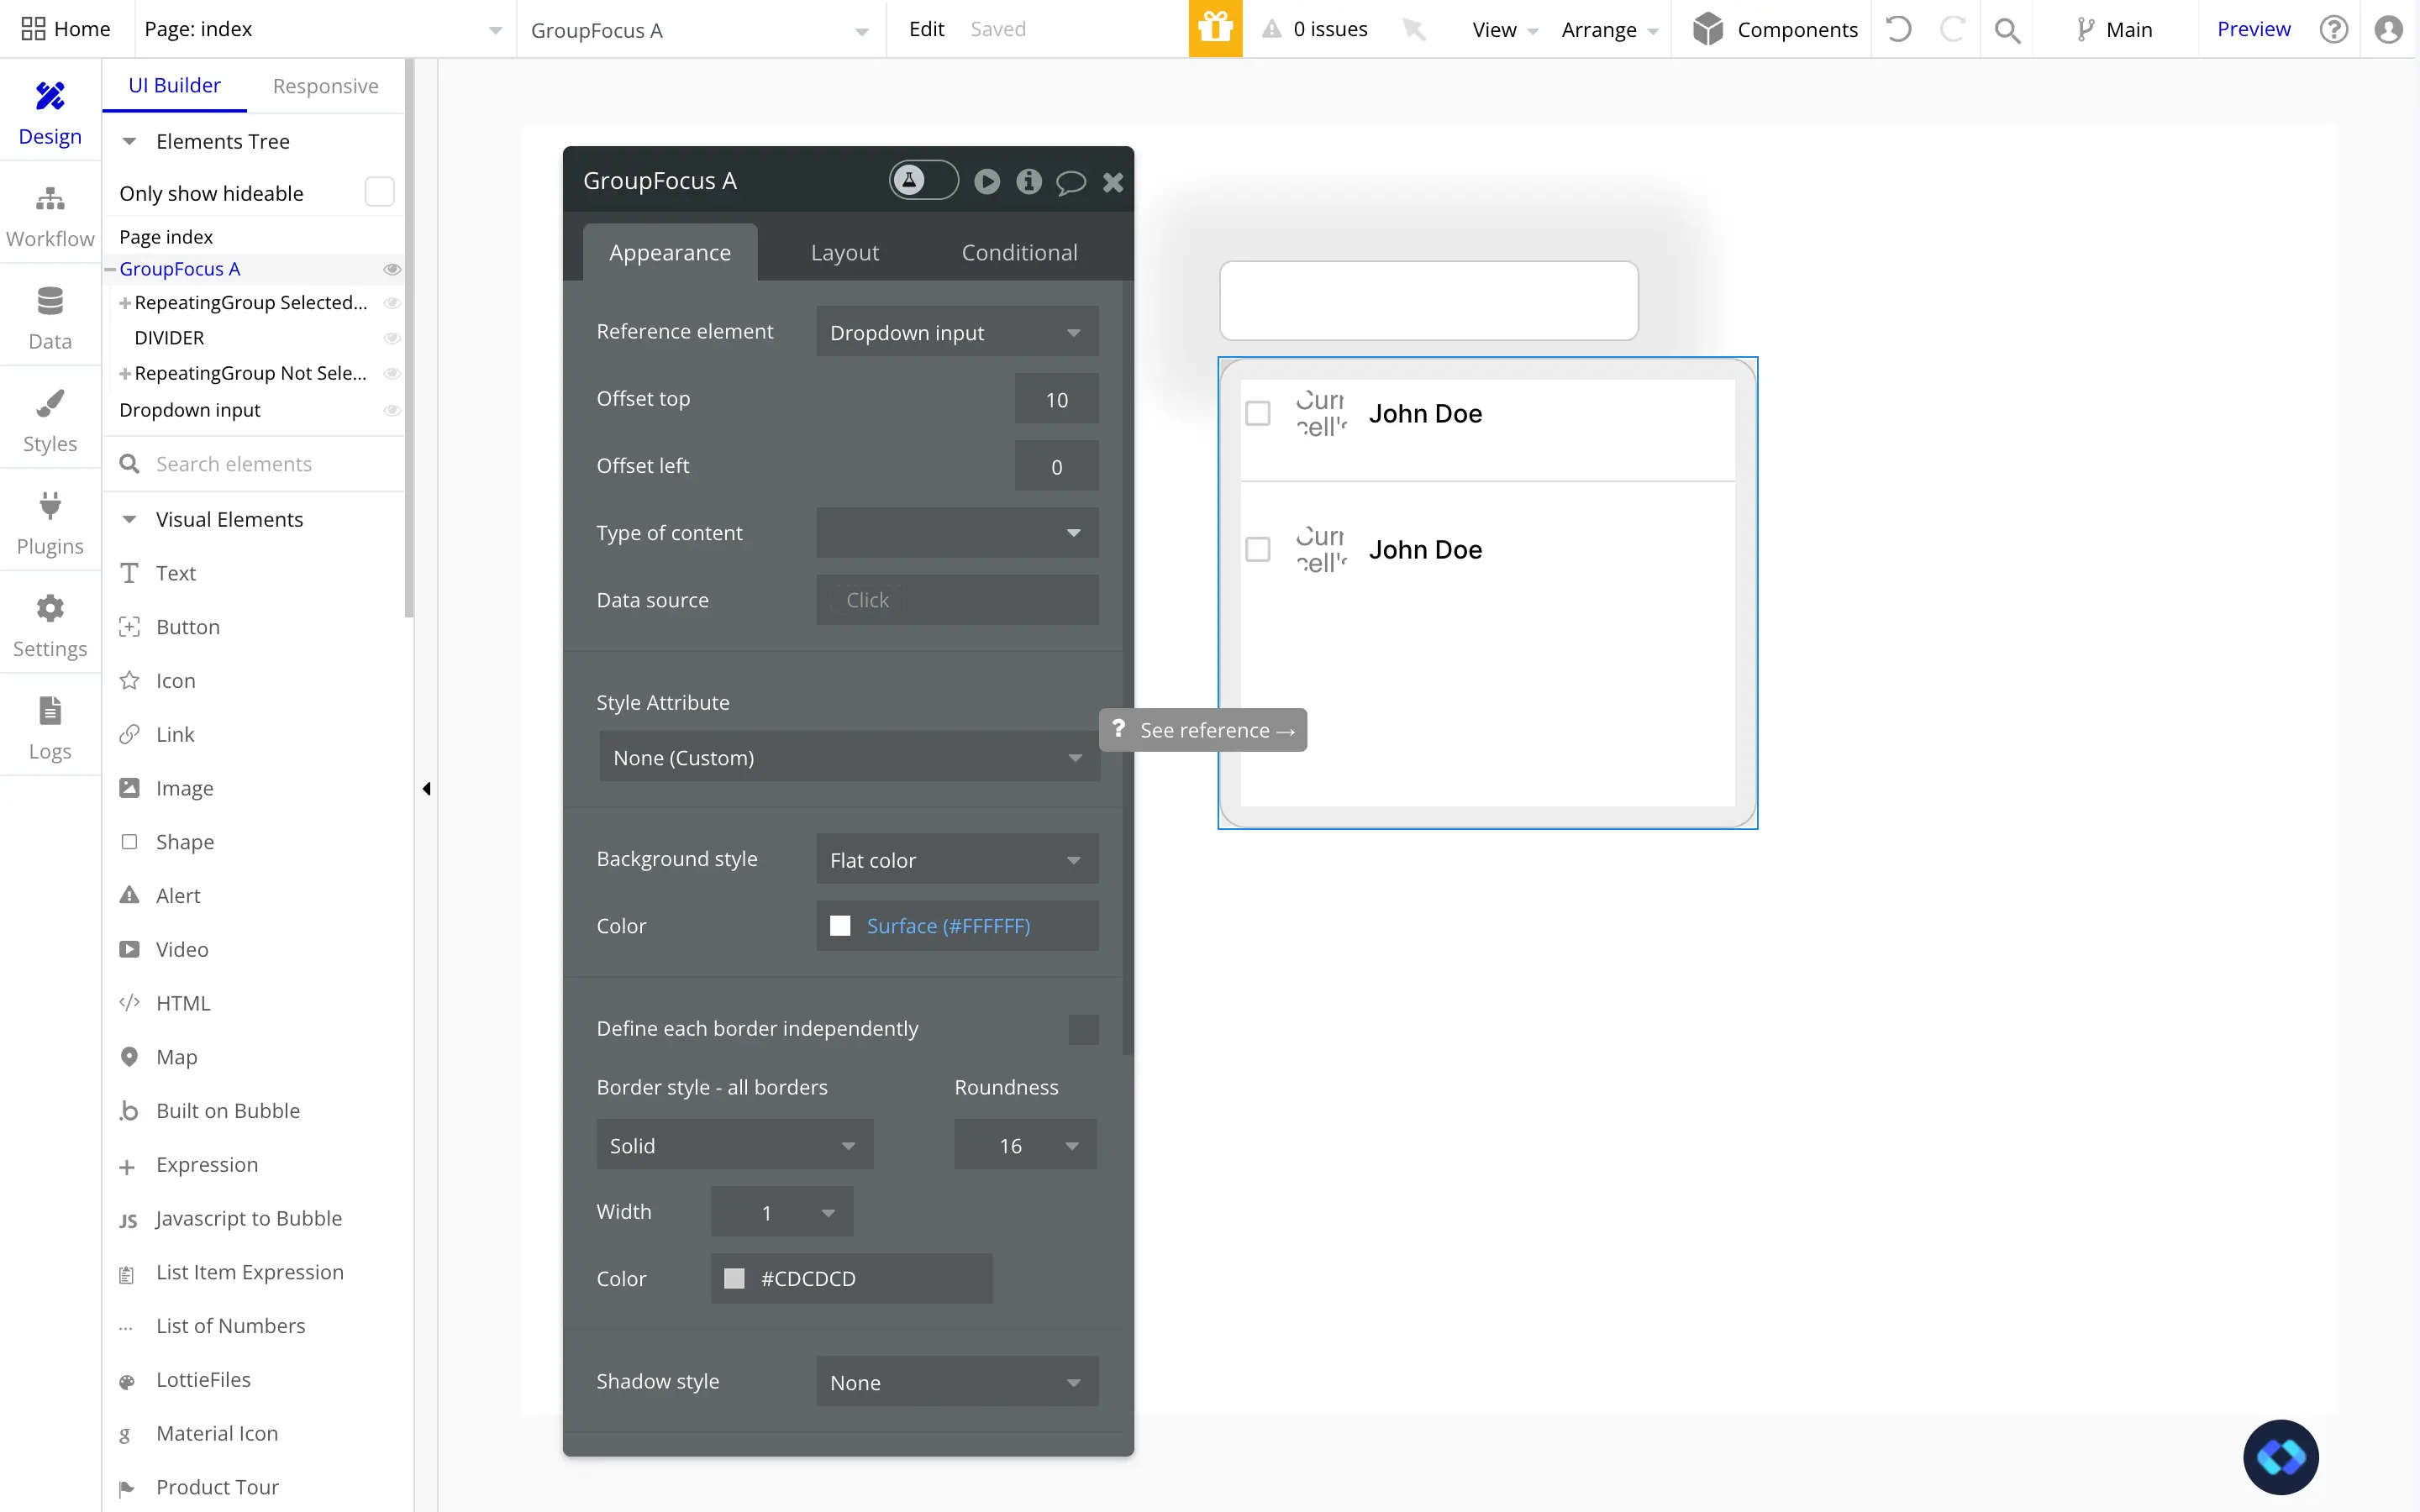
As you can see, the Reference Element of my Group Focus is my "Dropdown input". This Dropdown input is simply a Group.
Why ? Because later we are going to insert a Repeating Group to display the tags within it.
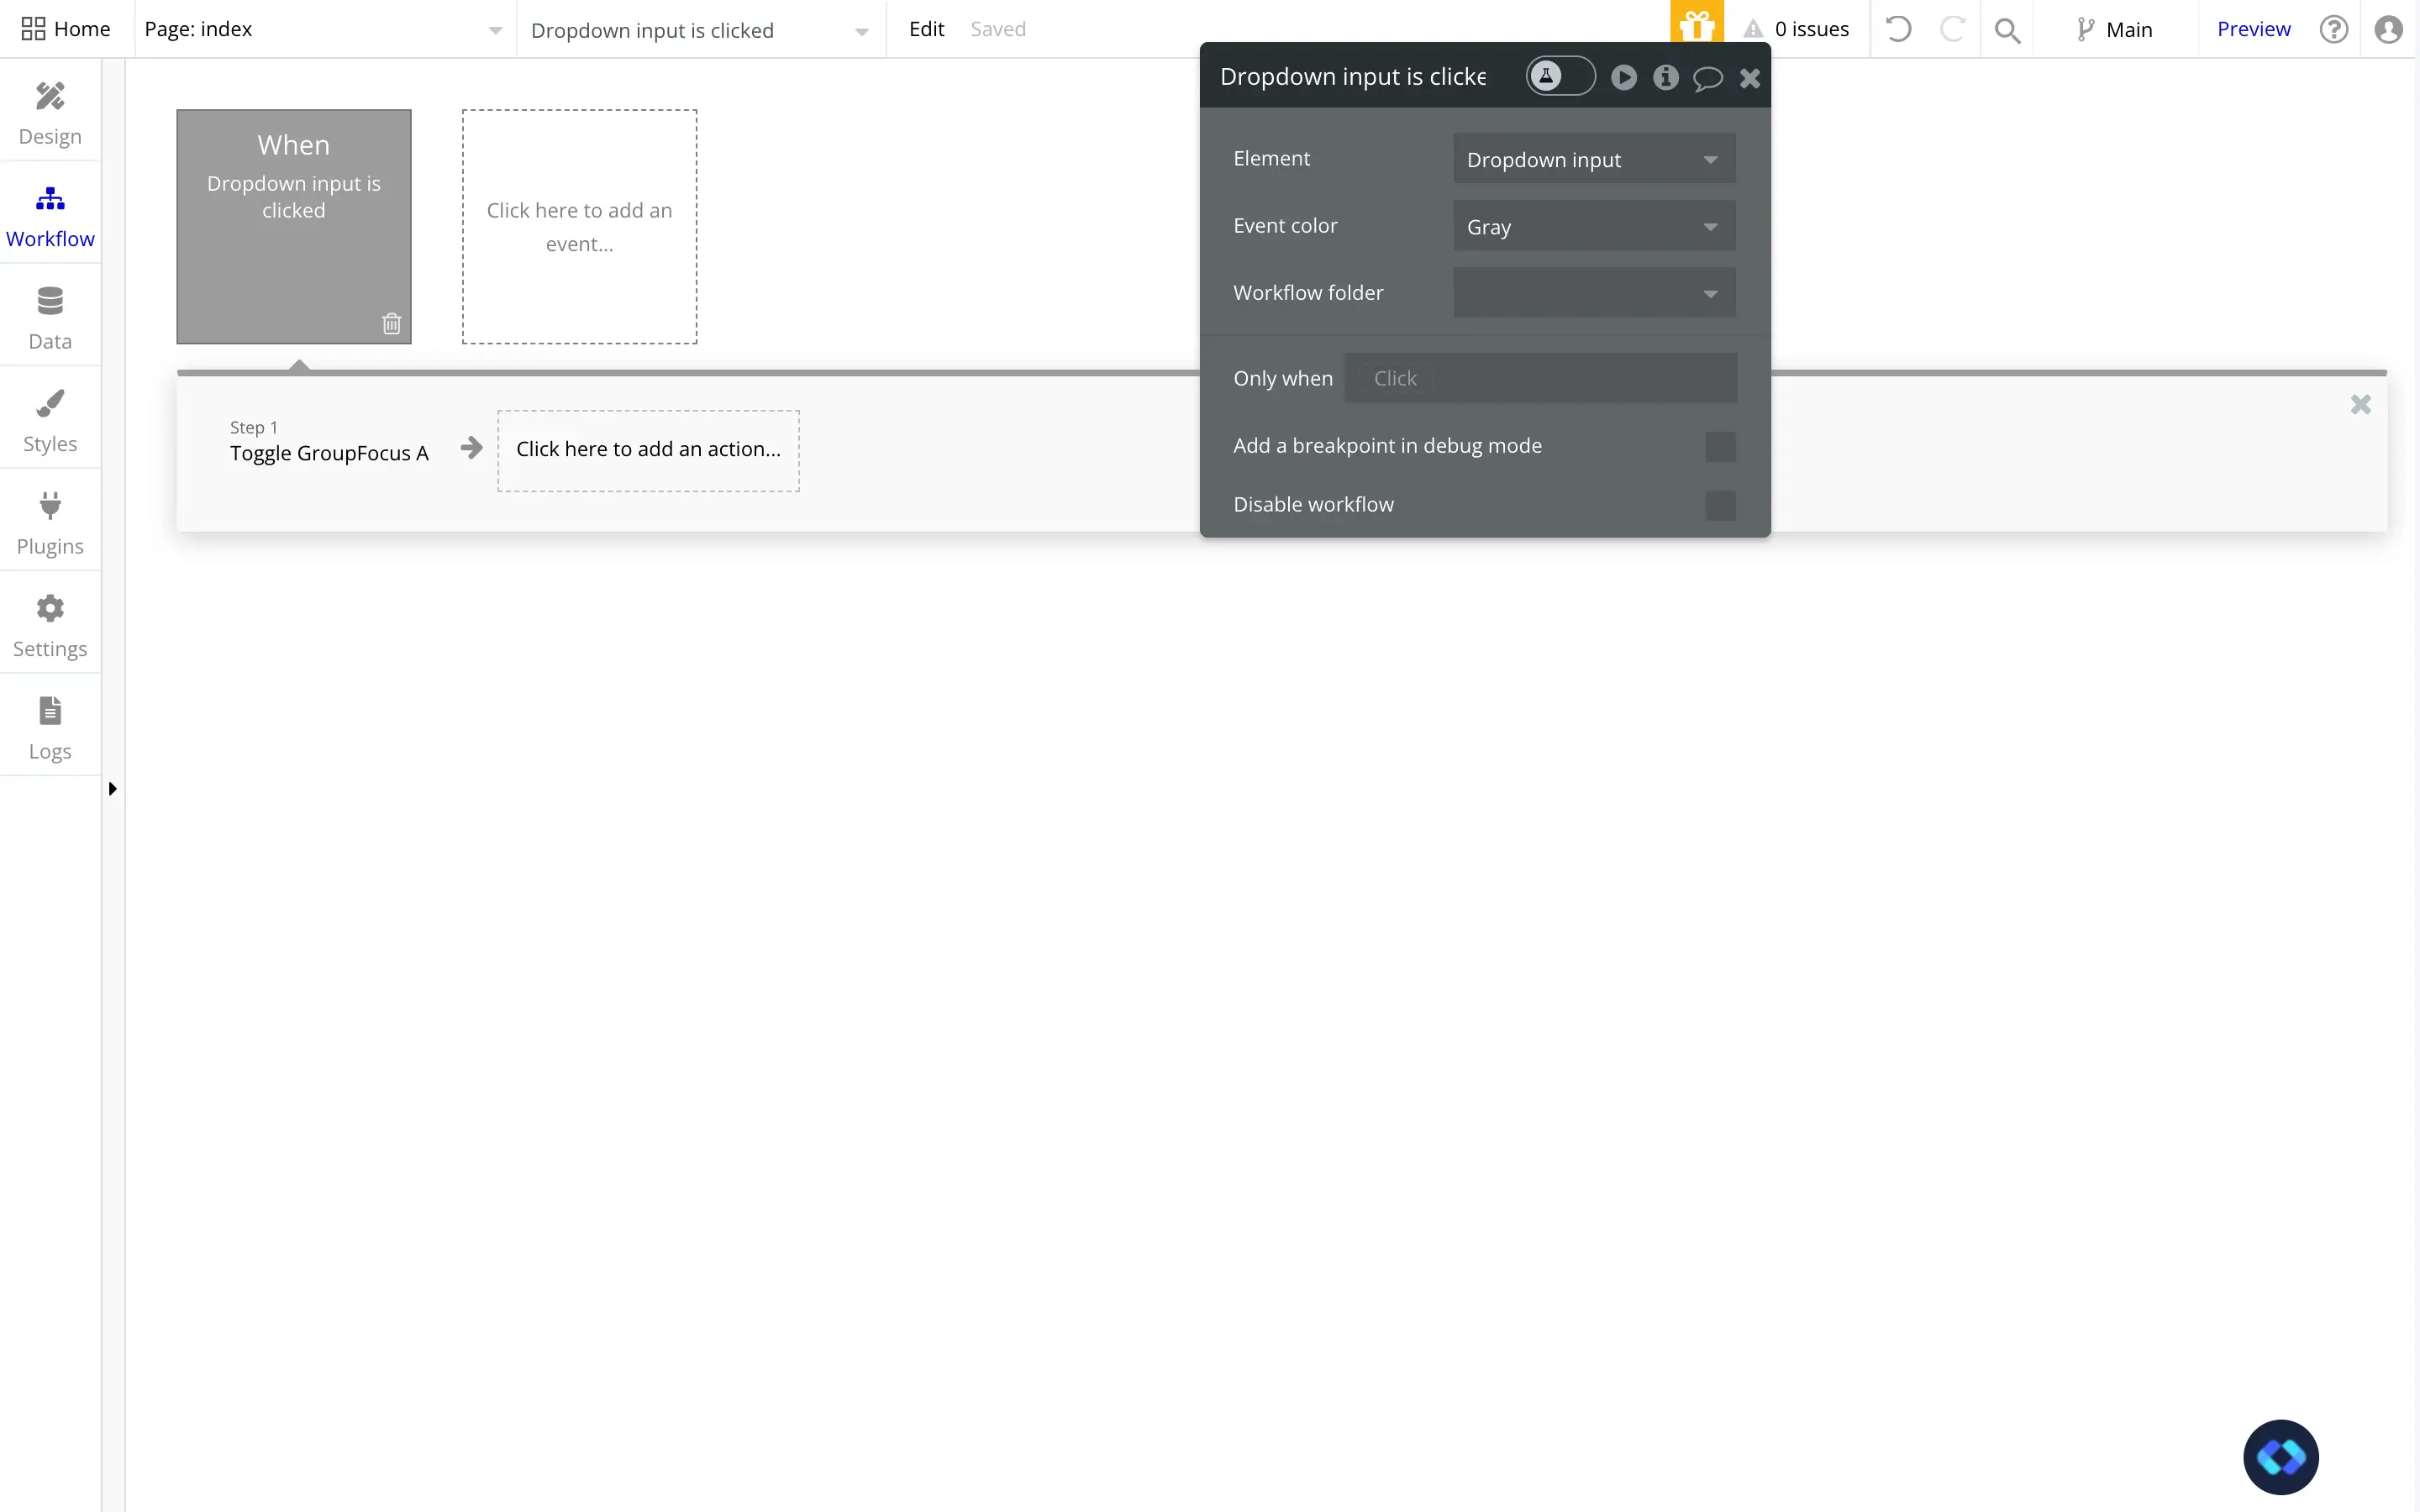
Finally, in order to make this Group Focus appear, we need to add a Workflow that toggles the Group Focus when the Dropdown Input is clicked :
Setting up our Custom State
Before going any further, we need to add a custom state to our page.
What will we use this Custom State for ?
To store the data that have been selected.
You can see this Custom State as a "basket" that will hold the data selected by our user.
So go ahead and create a Custom State on our Group Focus :
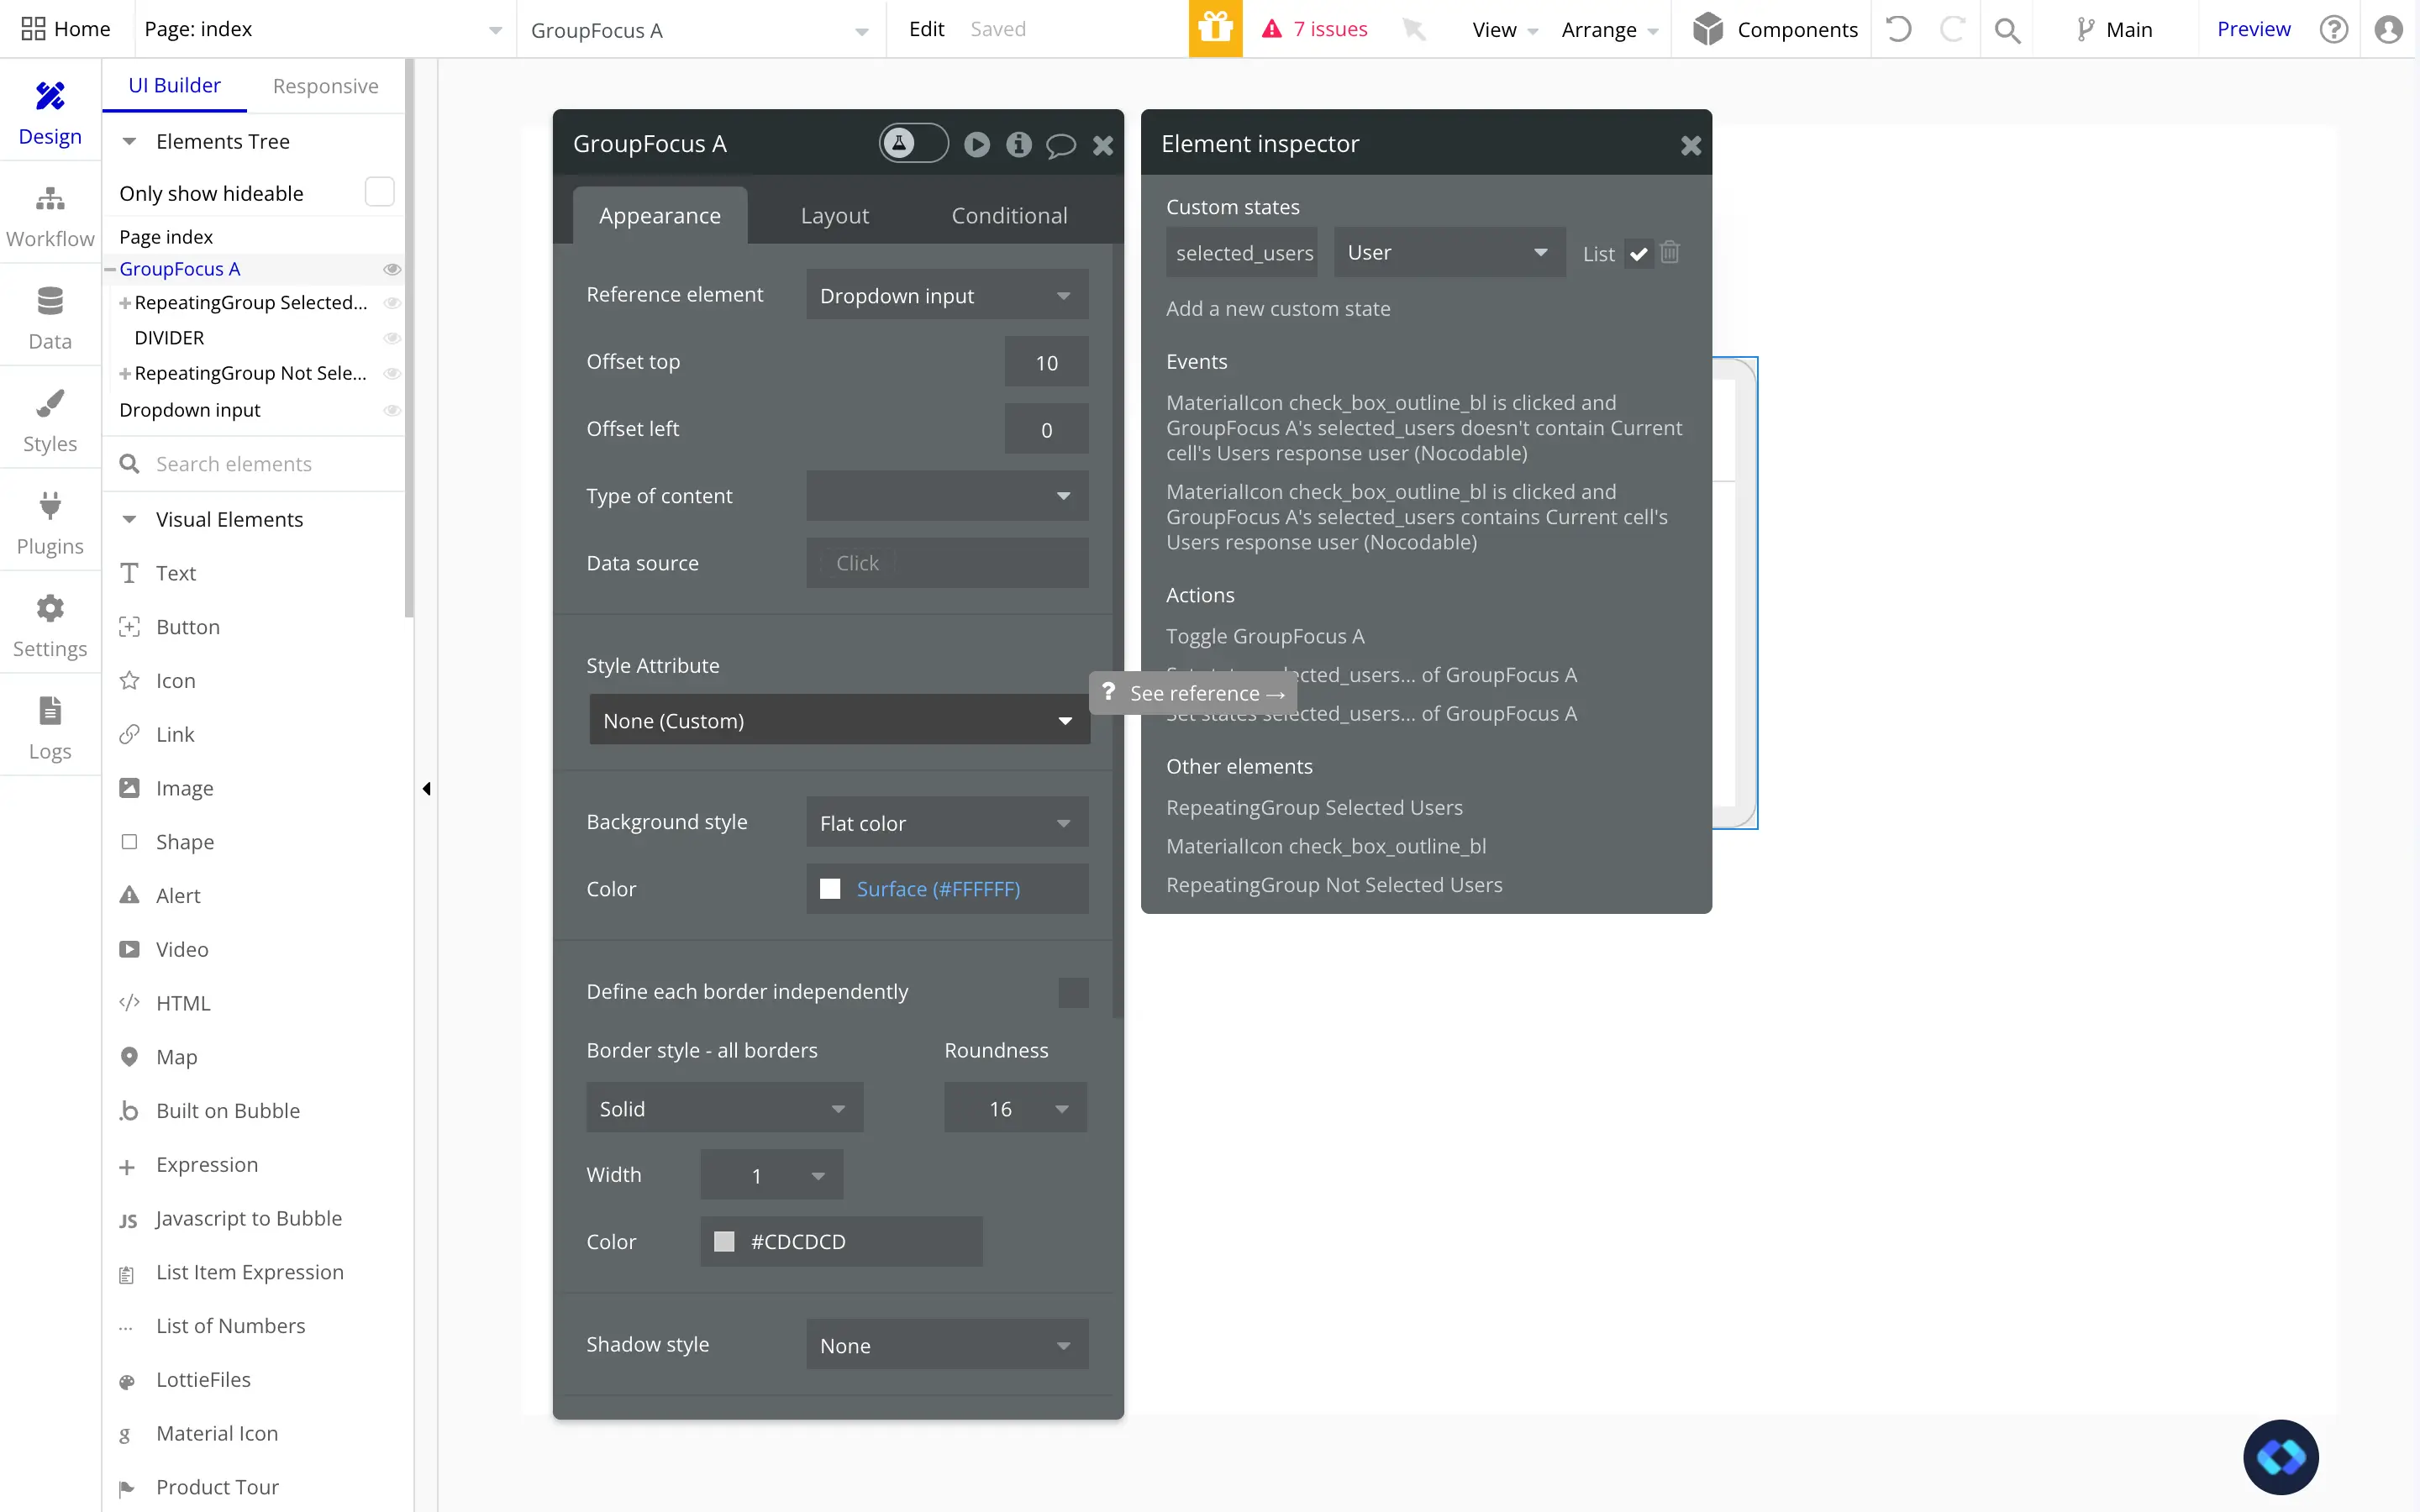
Be careful : It is very important to make sure that this Custom States is set to be a list and that it's the same type as the data displayed in your Repeating Groups !
For example, if you display Users in you Repeating Groups, make sure to set your Custom State type to a list of Users.
Setting up our Data Sources
Alright, now that we have our Group Focus ready, we not to fill our Repeating Groups with Data.
In this example, I'm going to use Nocodable Component's Bubble plugin to send some Dummy Data into my Repeating Groups.
Of course, you can set the Data Source of those Repeating Group to any data type you like.
First, let's set the data source of our Second Repeating Group (the one at the bottom of our Group Focus)
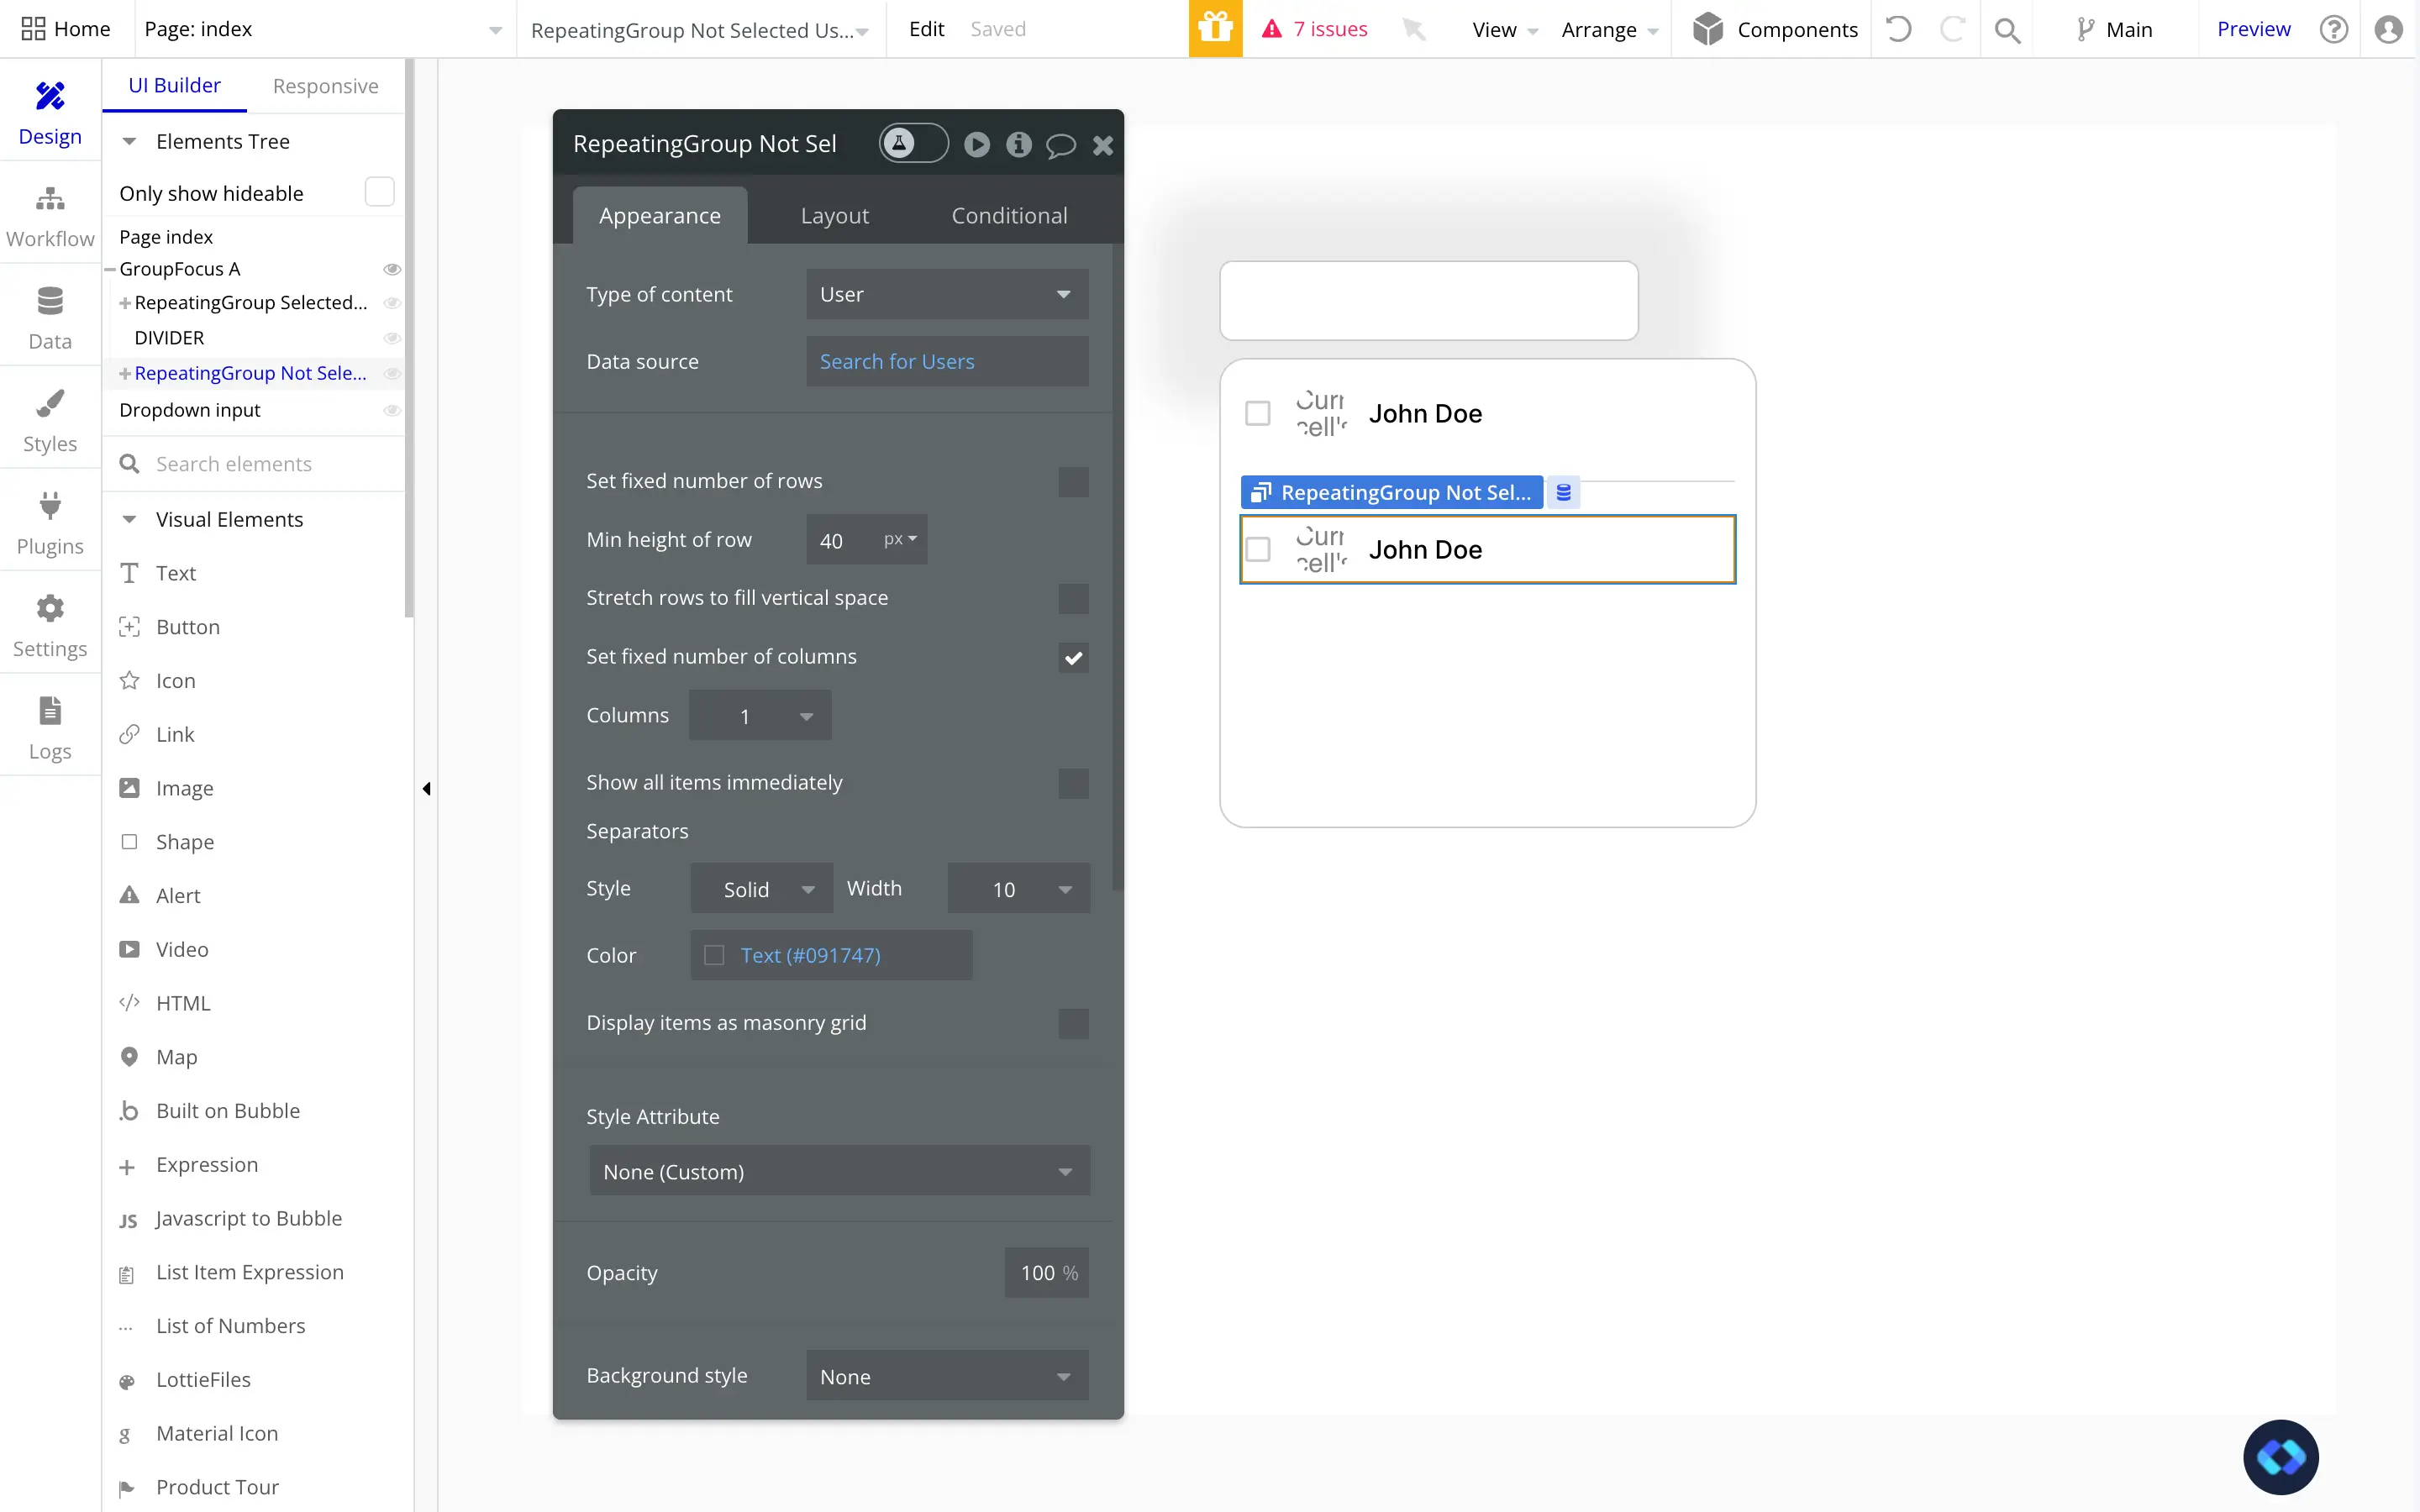
As you can see in this screenshot, I am feeding my Repeating Group with User (Note that the Type of Content is User).
It's the exact same type than the one in my Group Focus.
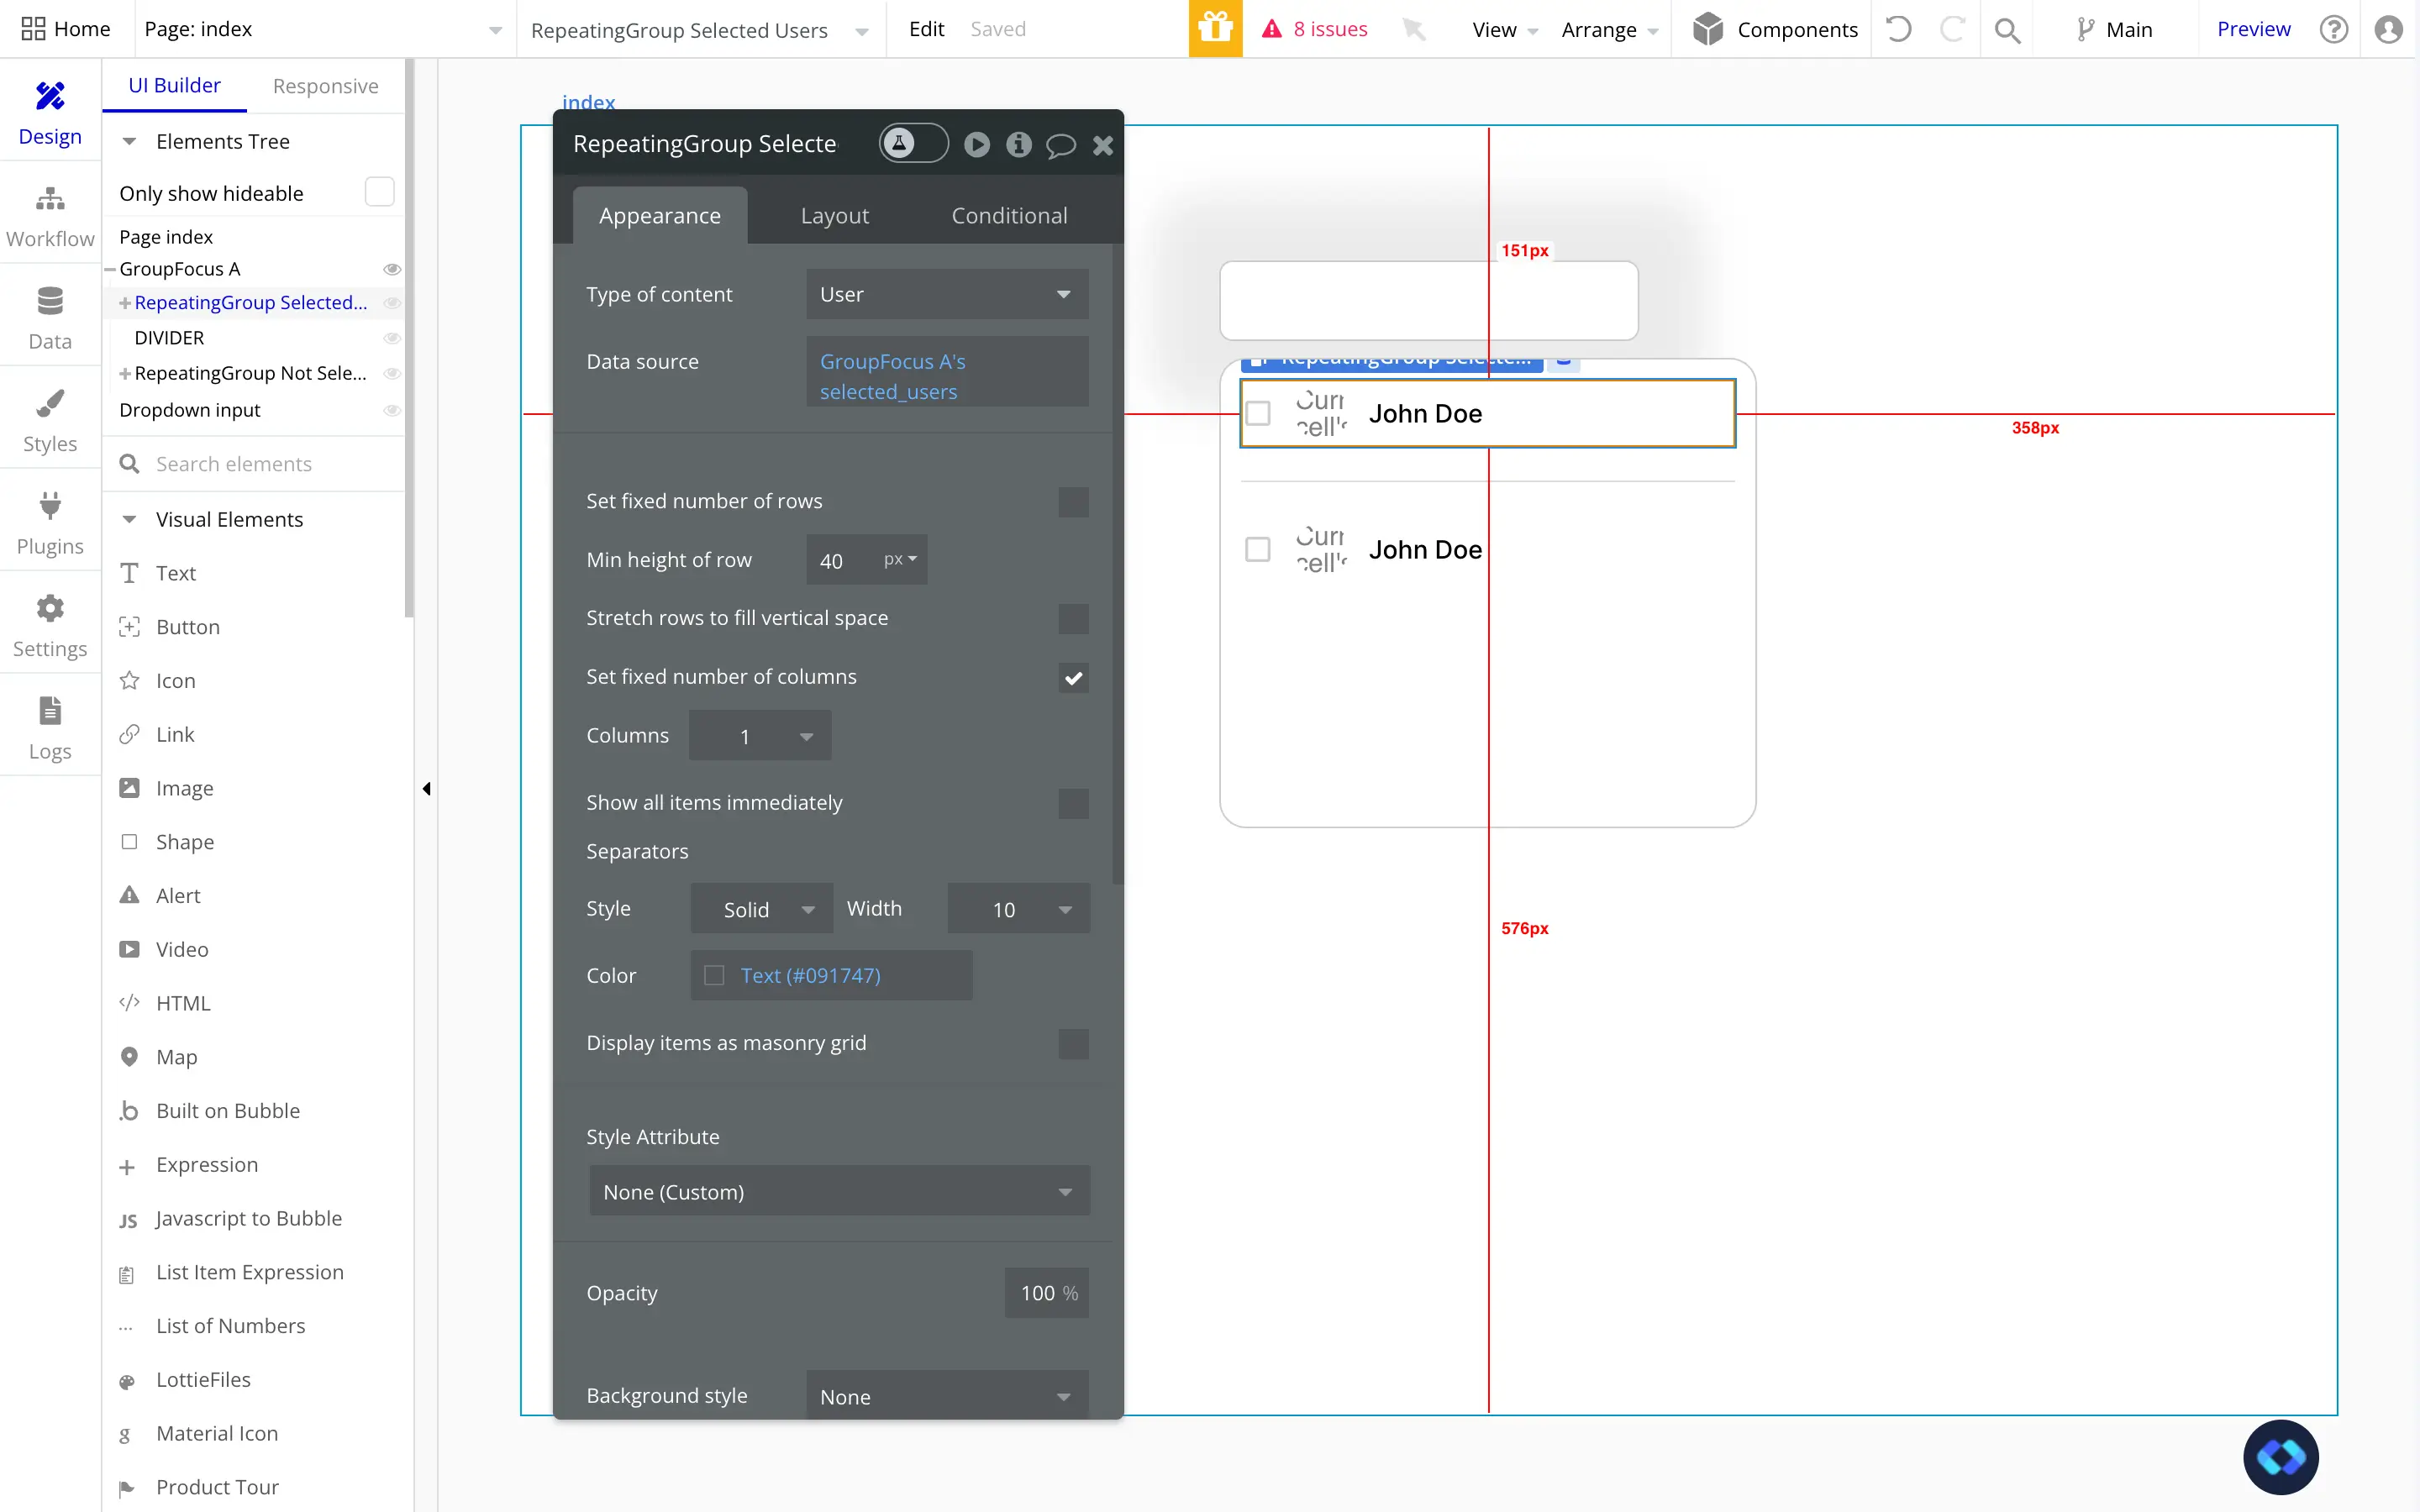
Okay now, let's set the Data Source of our First Repeating Group.
If you remember well, this Repeating Group will show only the user that have been selected !
And we're lucky, because we have a Custom States storing the Users we've selected !
So we can simply set the Data Source of this Repeating Group to be the list of User stored in our Custom state.
Easy as that.
Nice ! Now, this Repeating Group will show the list of things stored in our Custom State.
So, as soon as we will update this list, our Repeating Group will automatically reflect this change.
Setting up our Workflows
Alright, now that we have the first part of our Multiselect dropdown set up, we need to make it work.
What we need it to do is to add Users to our Custom states when the checkbox is ticked, and remove them when the checkbox is clicked again.
To do this, we will need two workflows :
1 - Adding a User to our list of selected Users
If you're still following, you know that we are going to update our Custom States.
To do this, simply add this workflow on the checkbox :
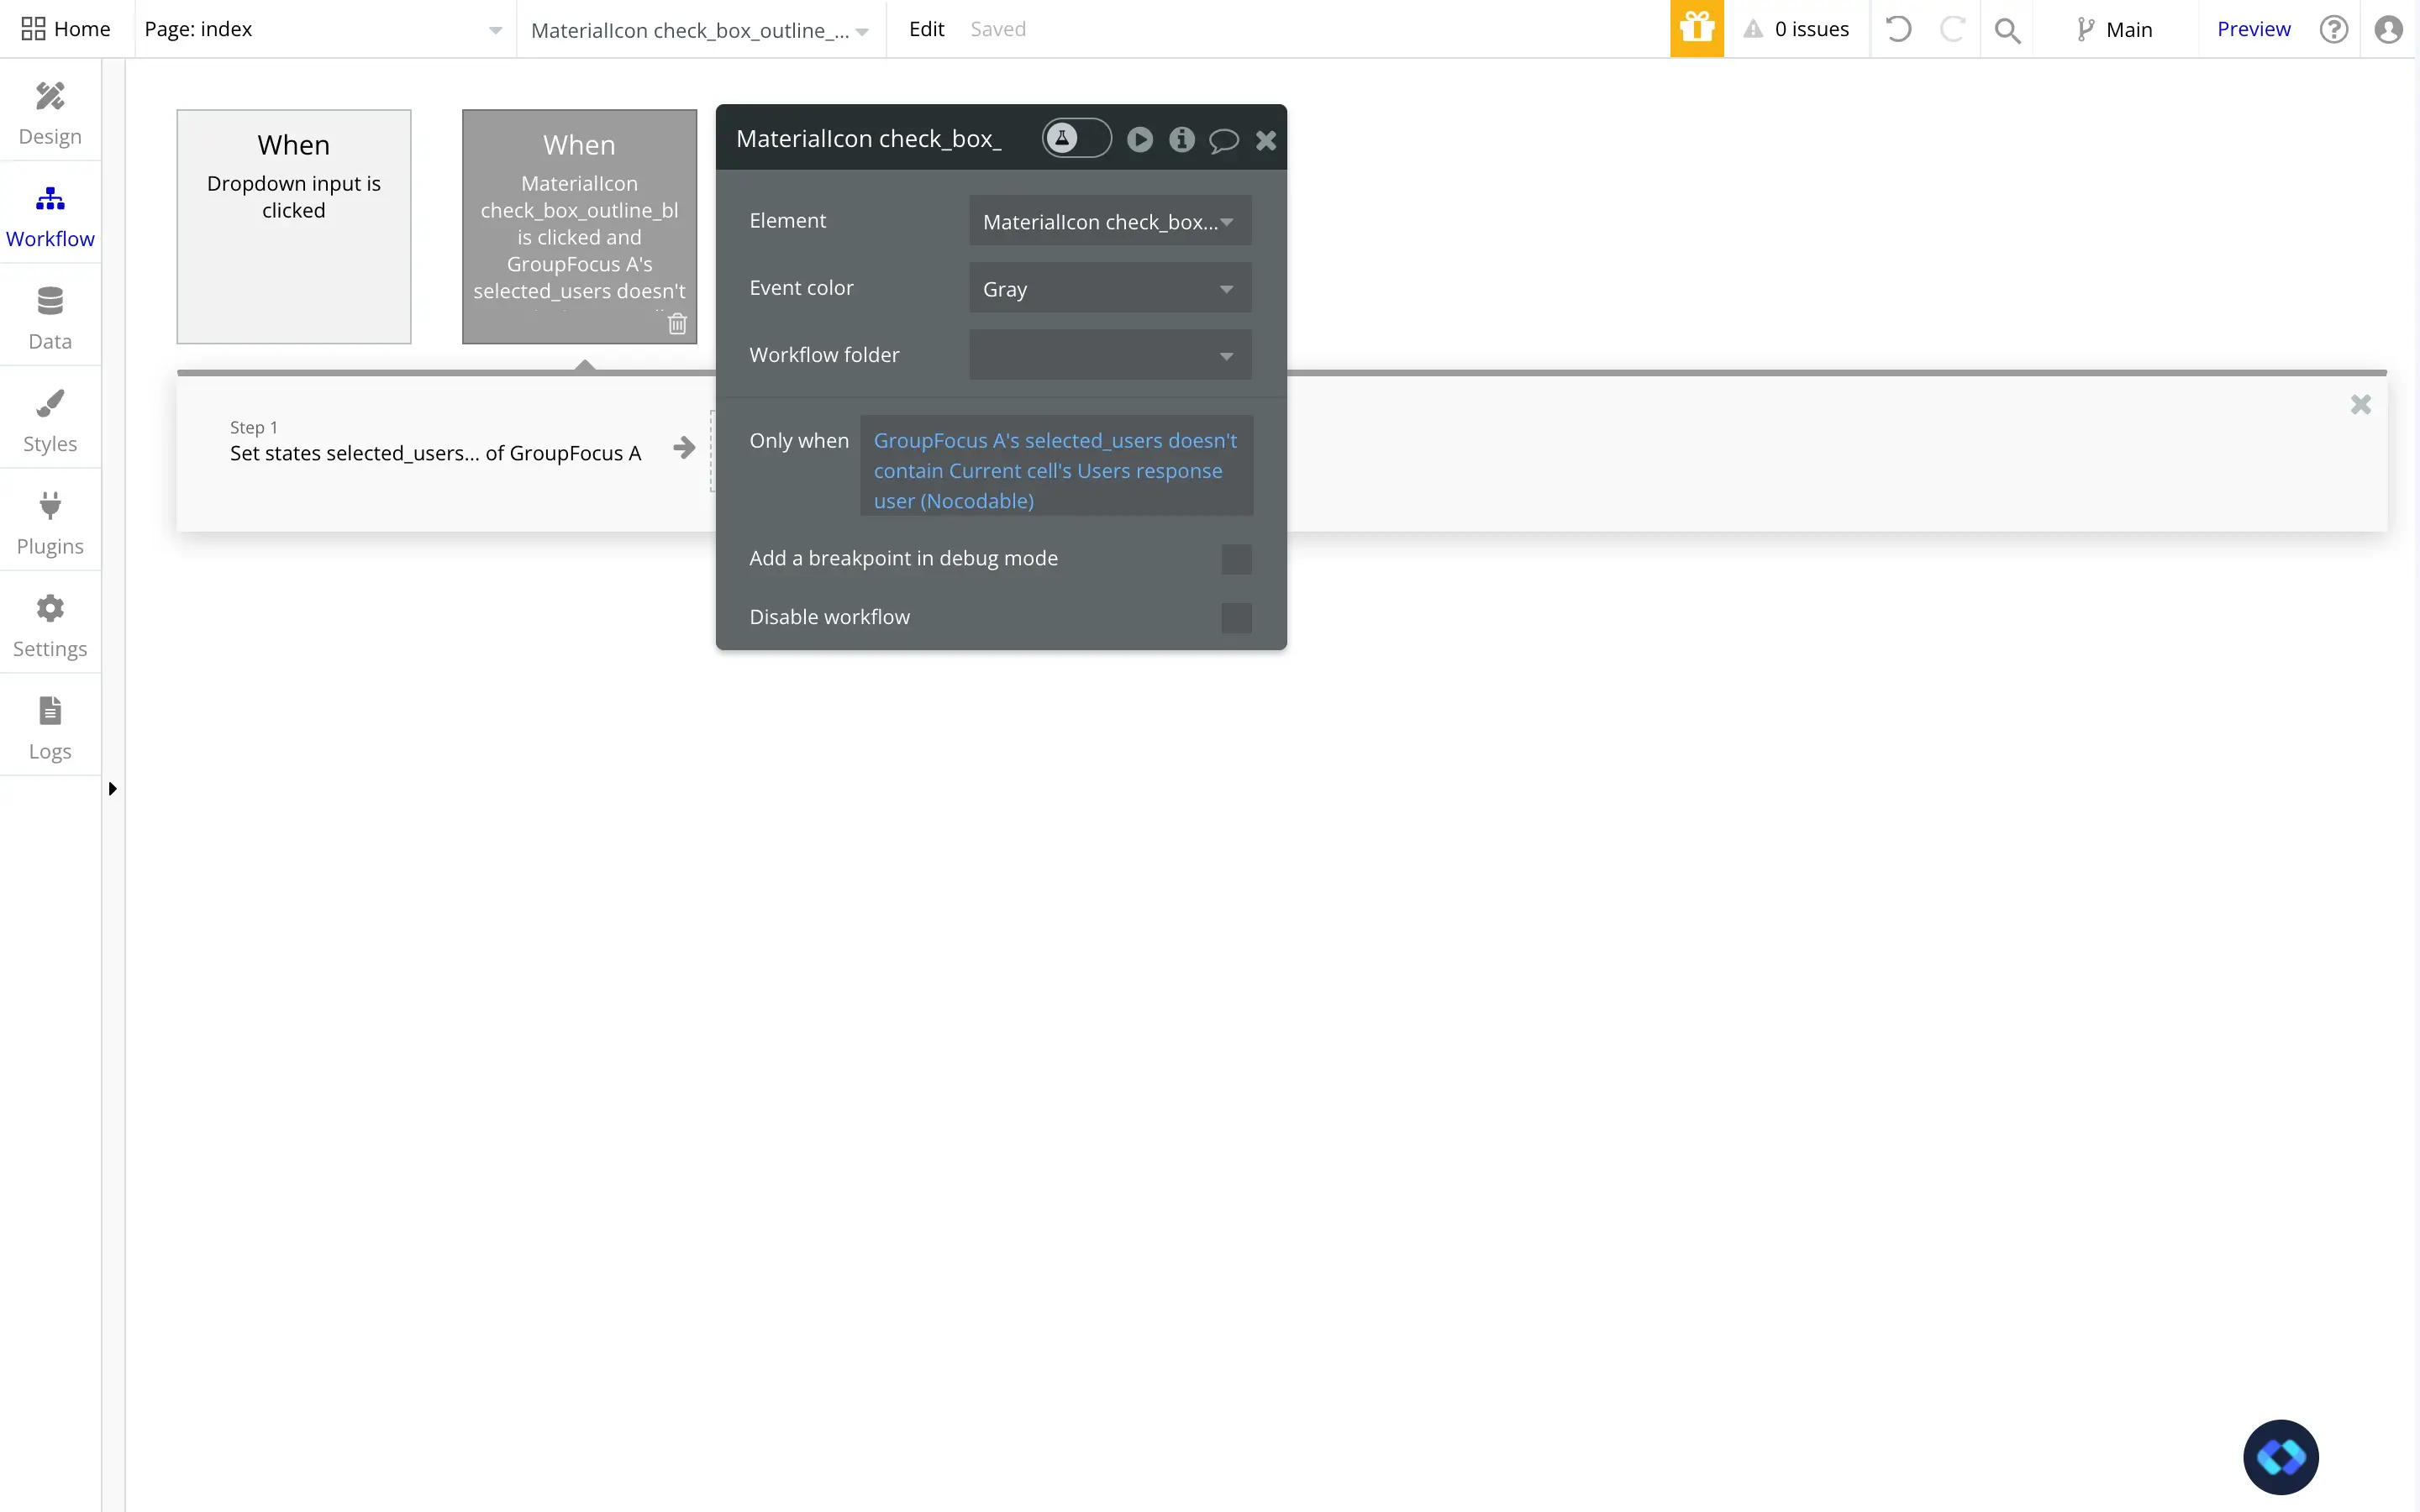
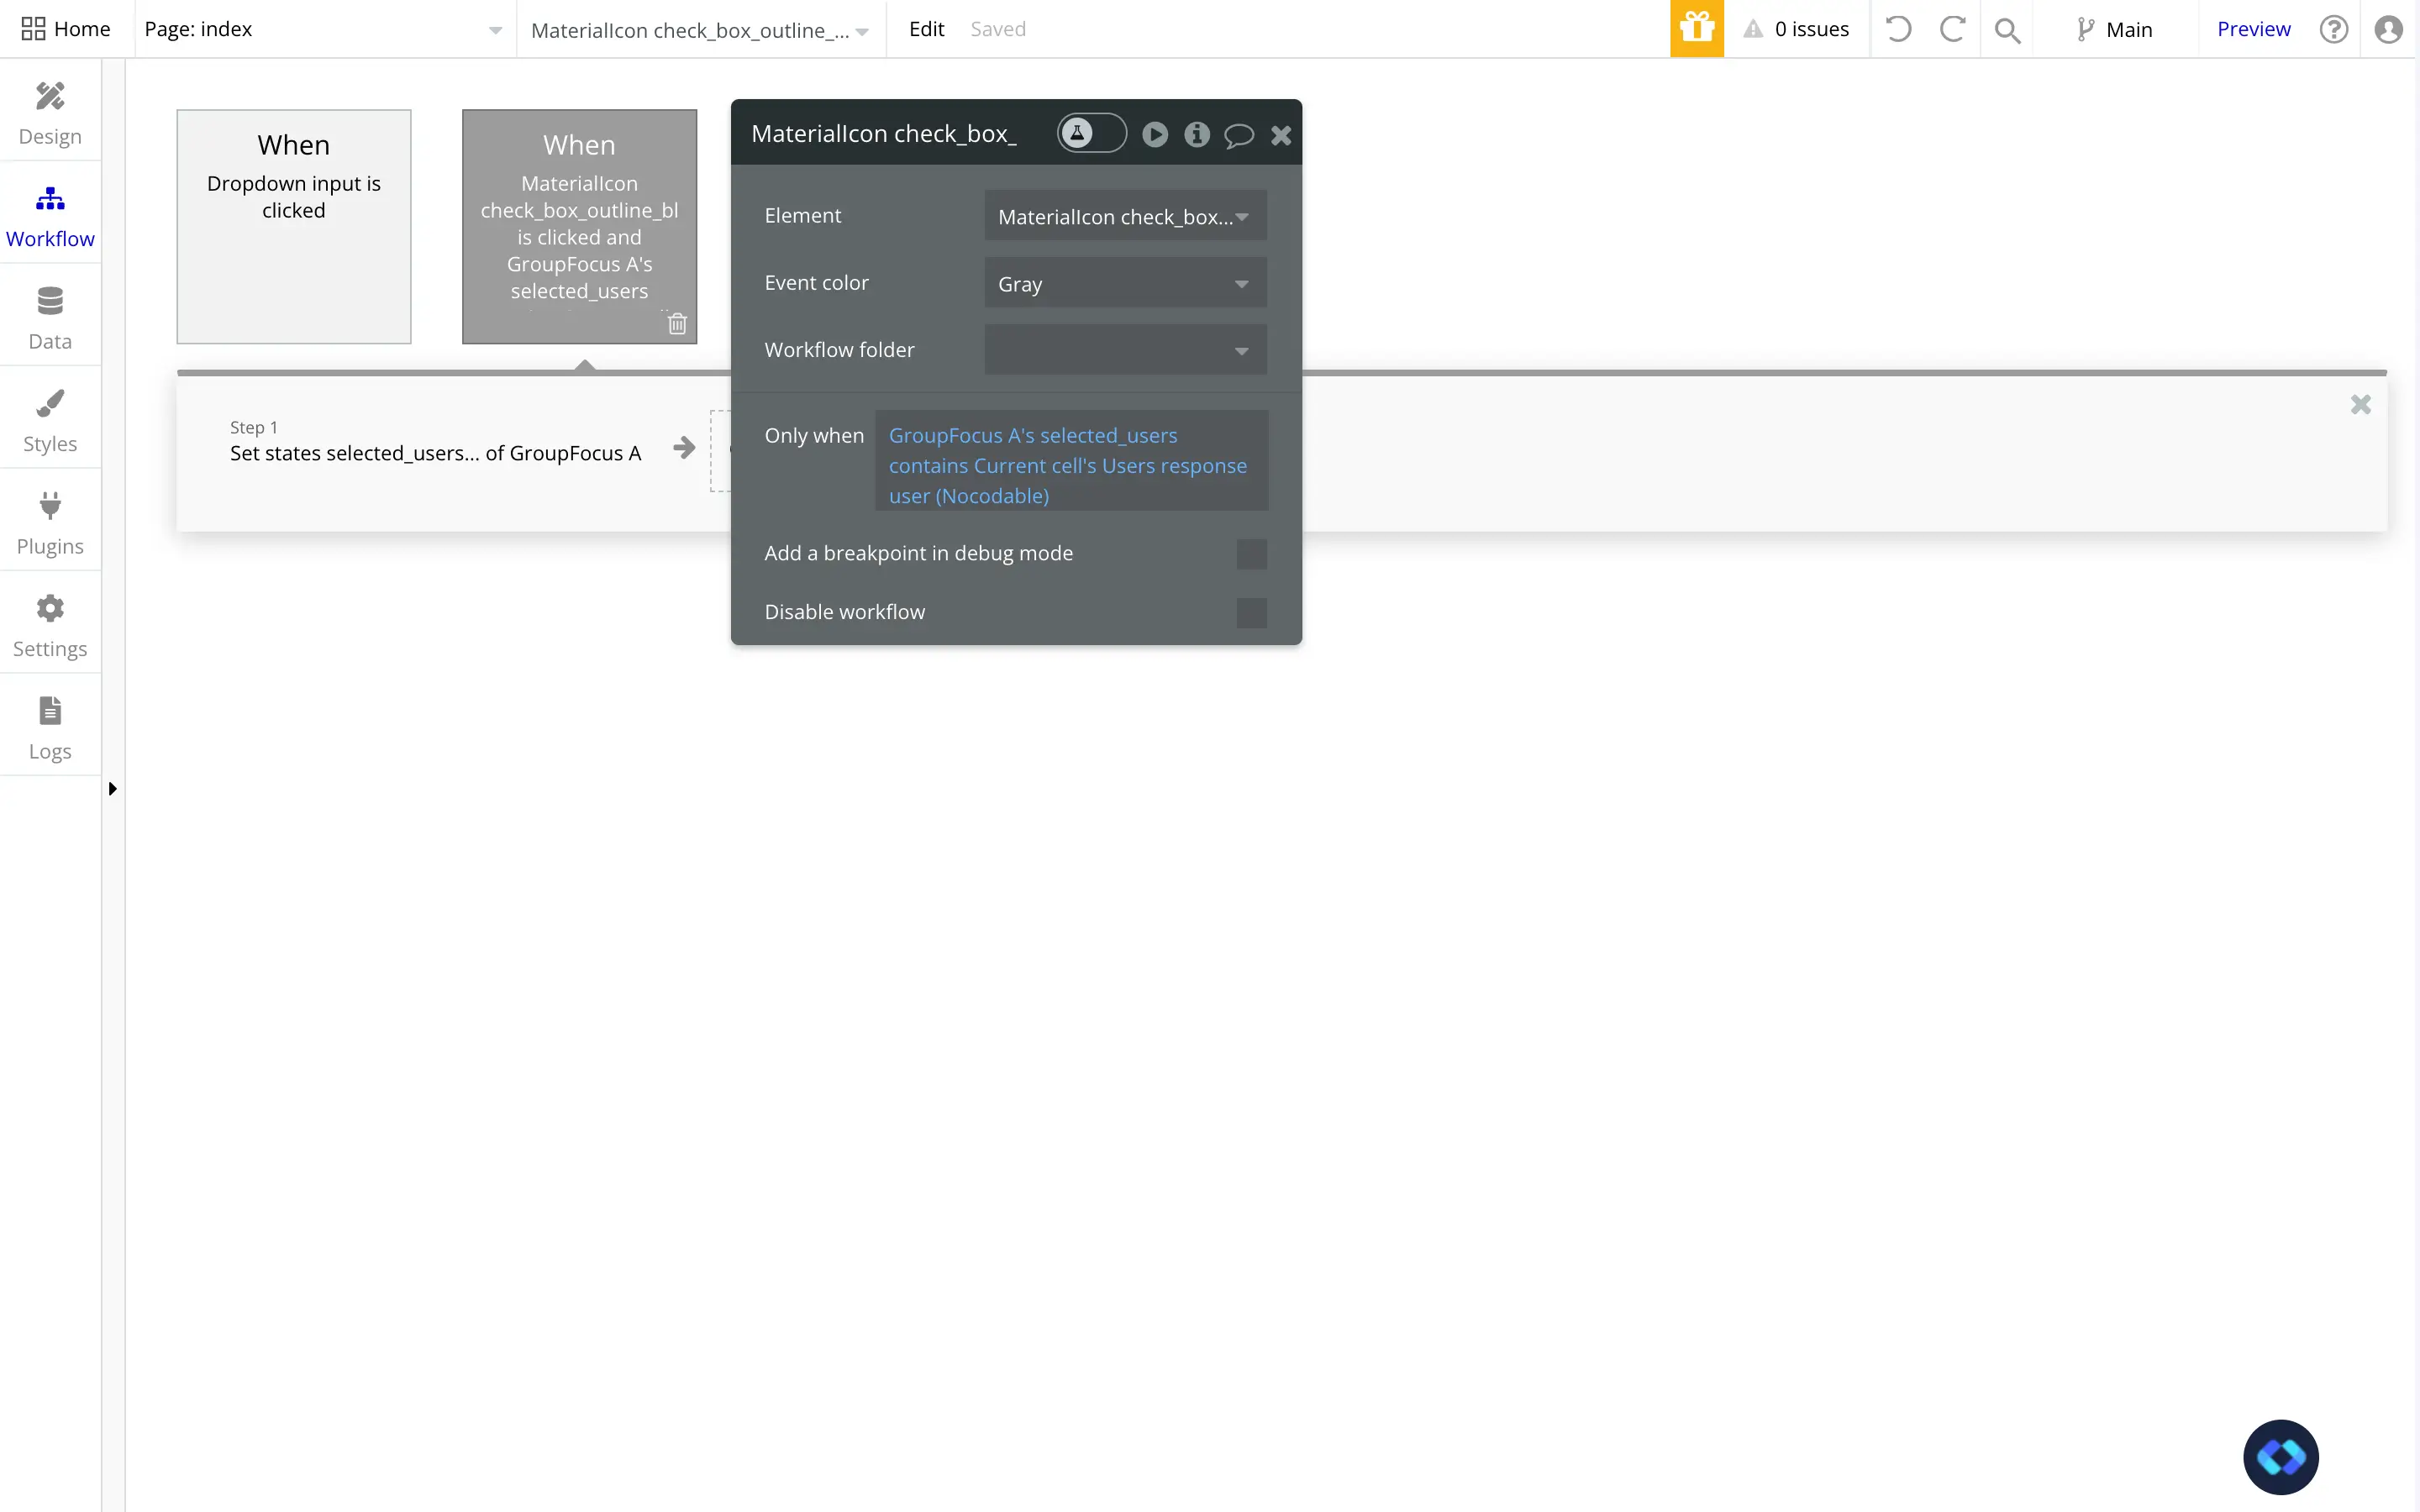
Note that there is a condition ON THE WORKFLOW itself.
Why this condition ? Because we want this workflow to trigger only when the user is not present in the list of our Selected User.
If this list of Selected User already contains this particular User, then we'll need to remove it from the list. But we'll do that in the next step.
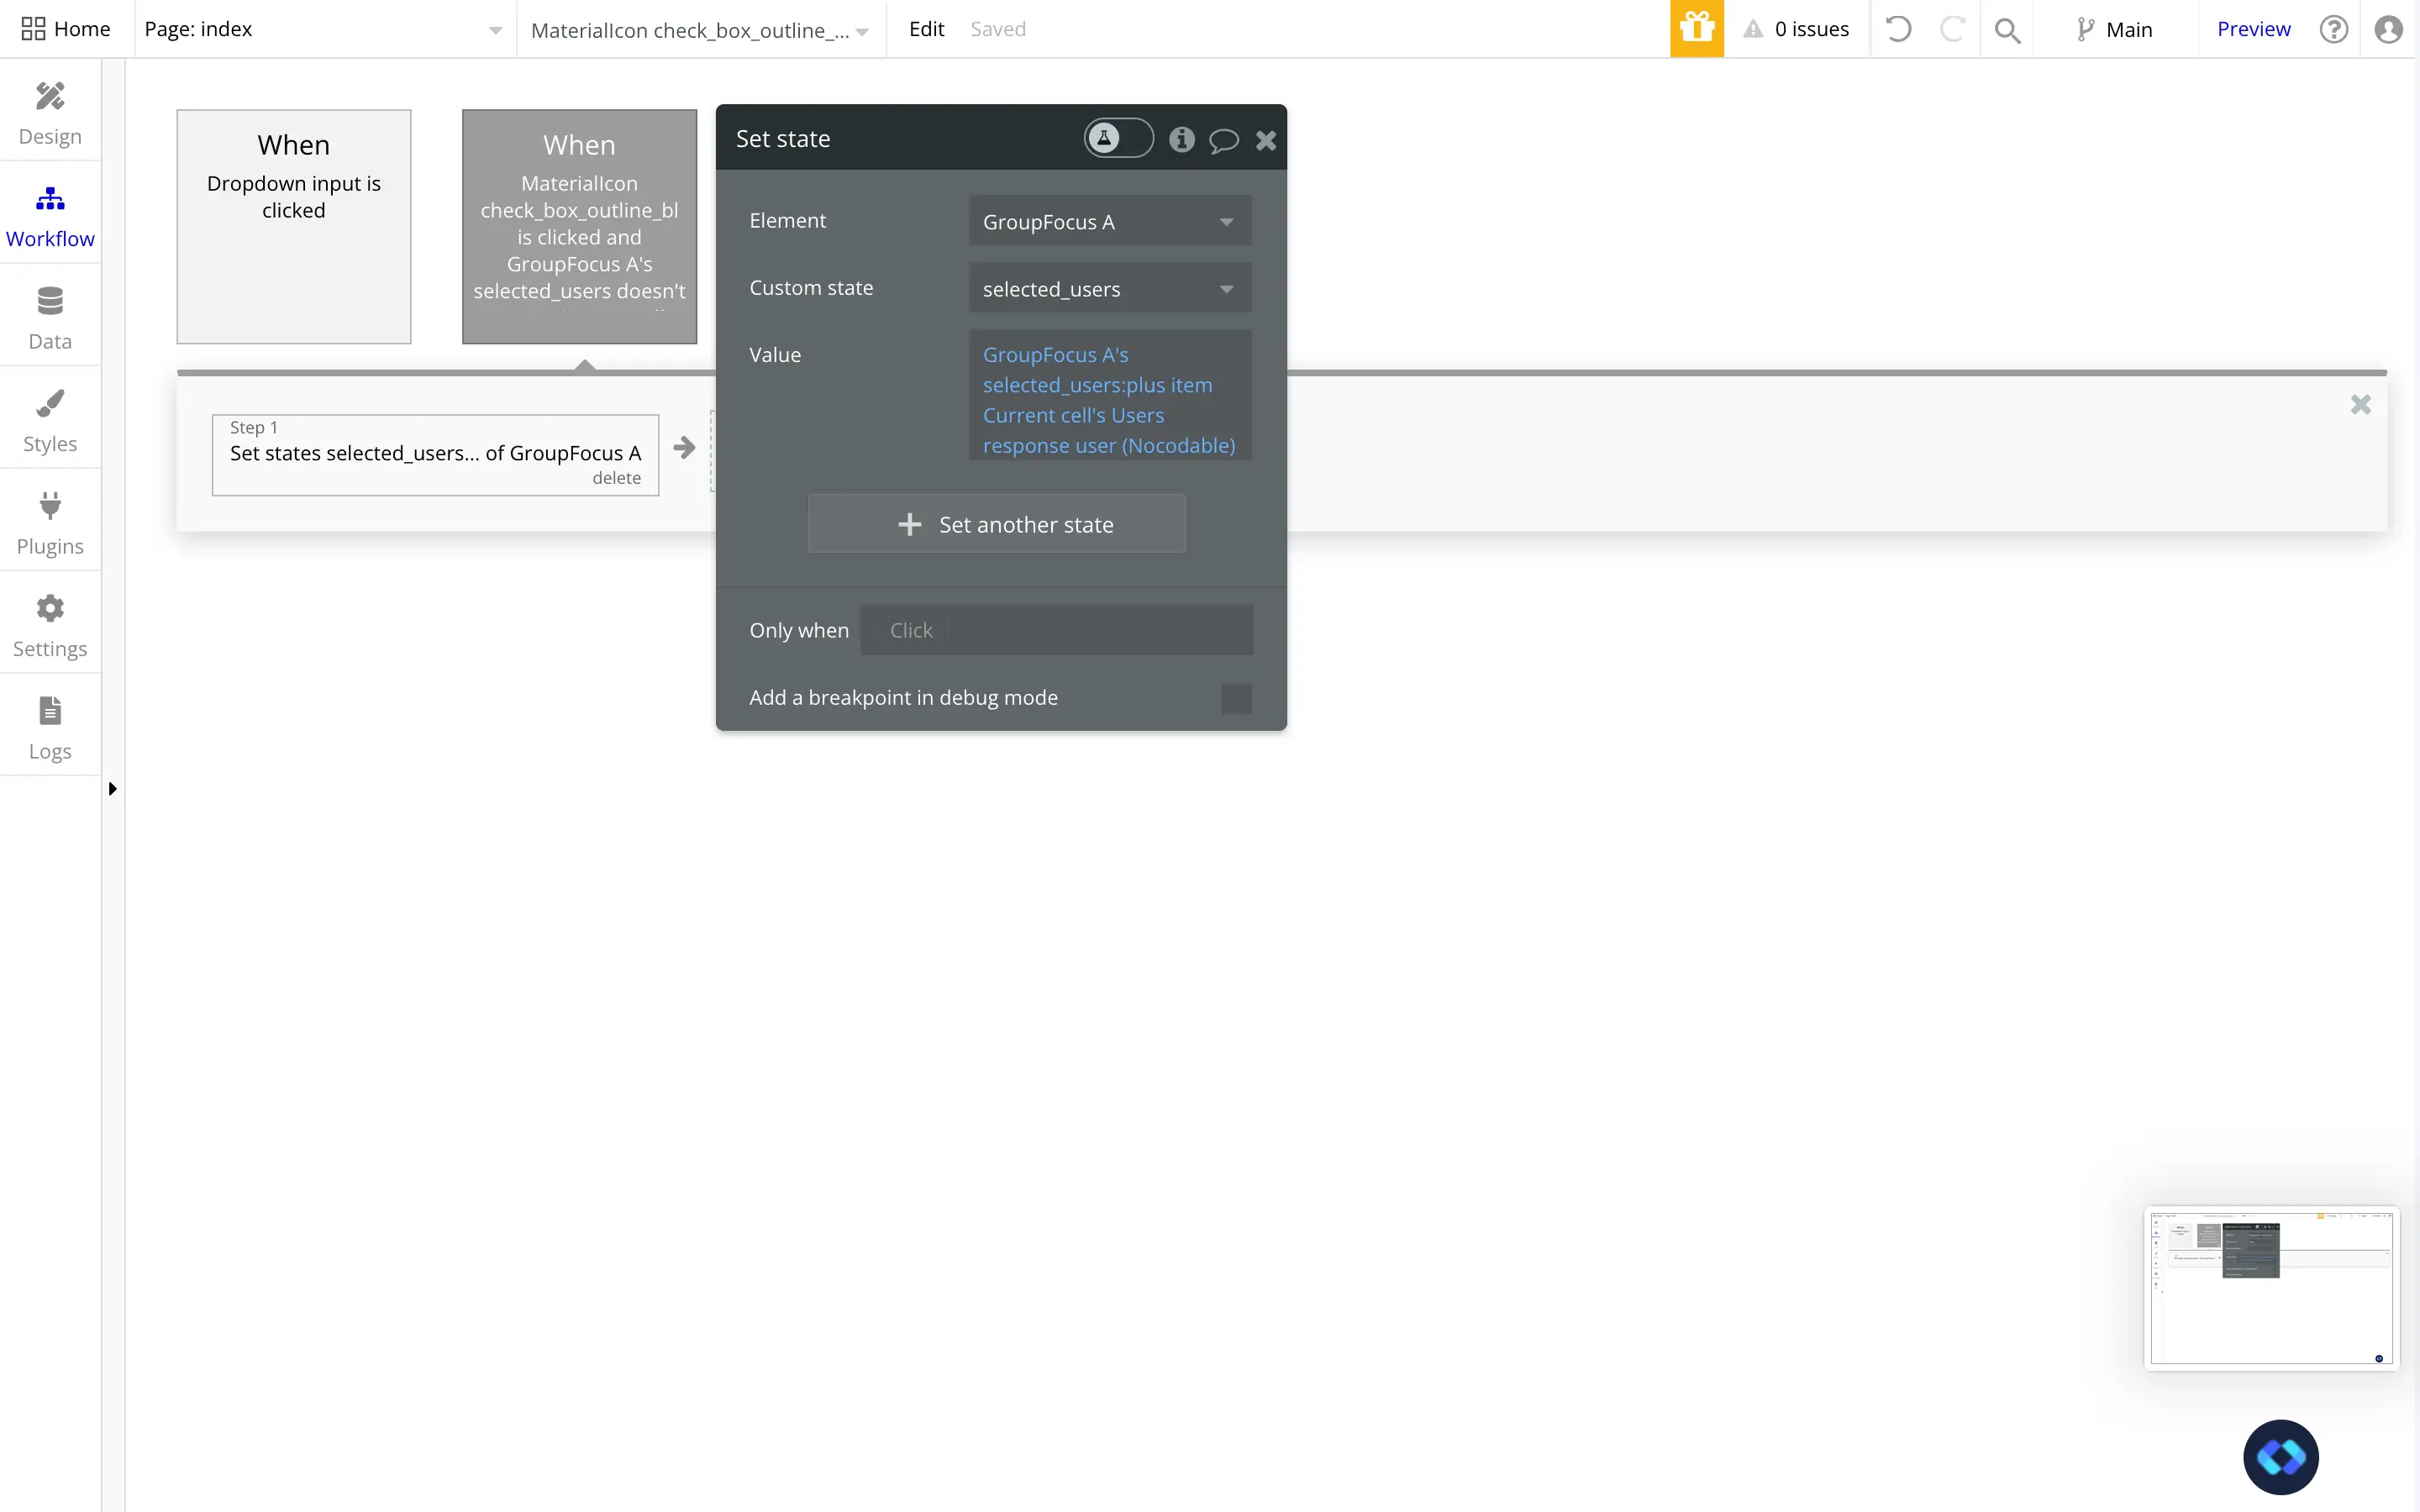
And in the workflow action, we will use a "Set State of an element" to update the list of the Selected Users.
As you can see in the Screenshot below, I'm using the :plusitem operator to add the user to the list.
1 - Removing a User to our list of selected Users
Now we need to be able to remove a User when the checkbox is clicked and the User is already selected.
To do this, we'll use the opposite of our previous workflow.
As you can see here, the condition of this workflow has been slightly modified.
Instead of "Doesn't contain", we're now using the "contains" operator.
Therefore, this workflow will be triggered ONLY WHEN this User is already selected.
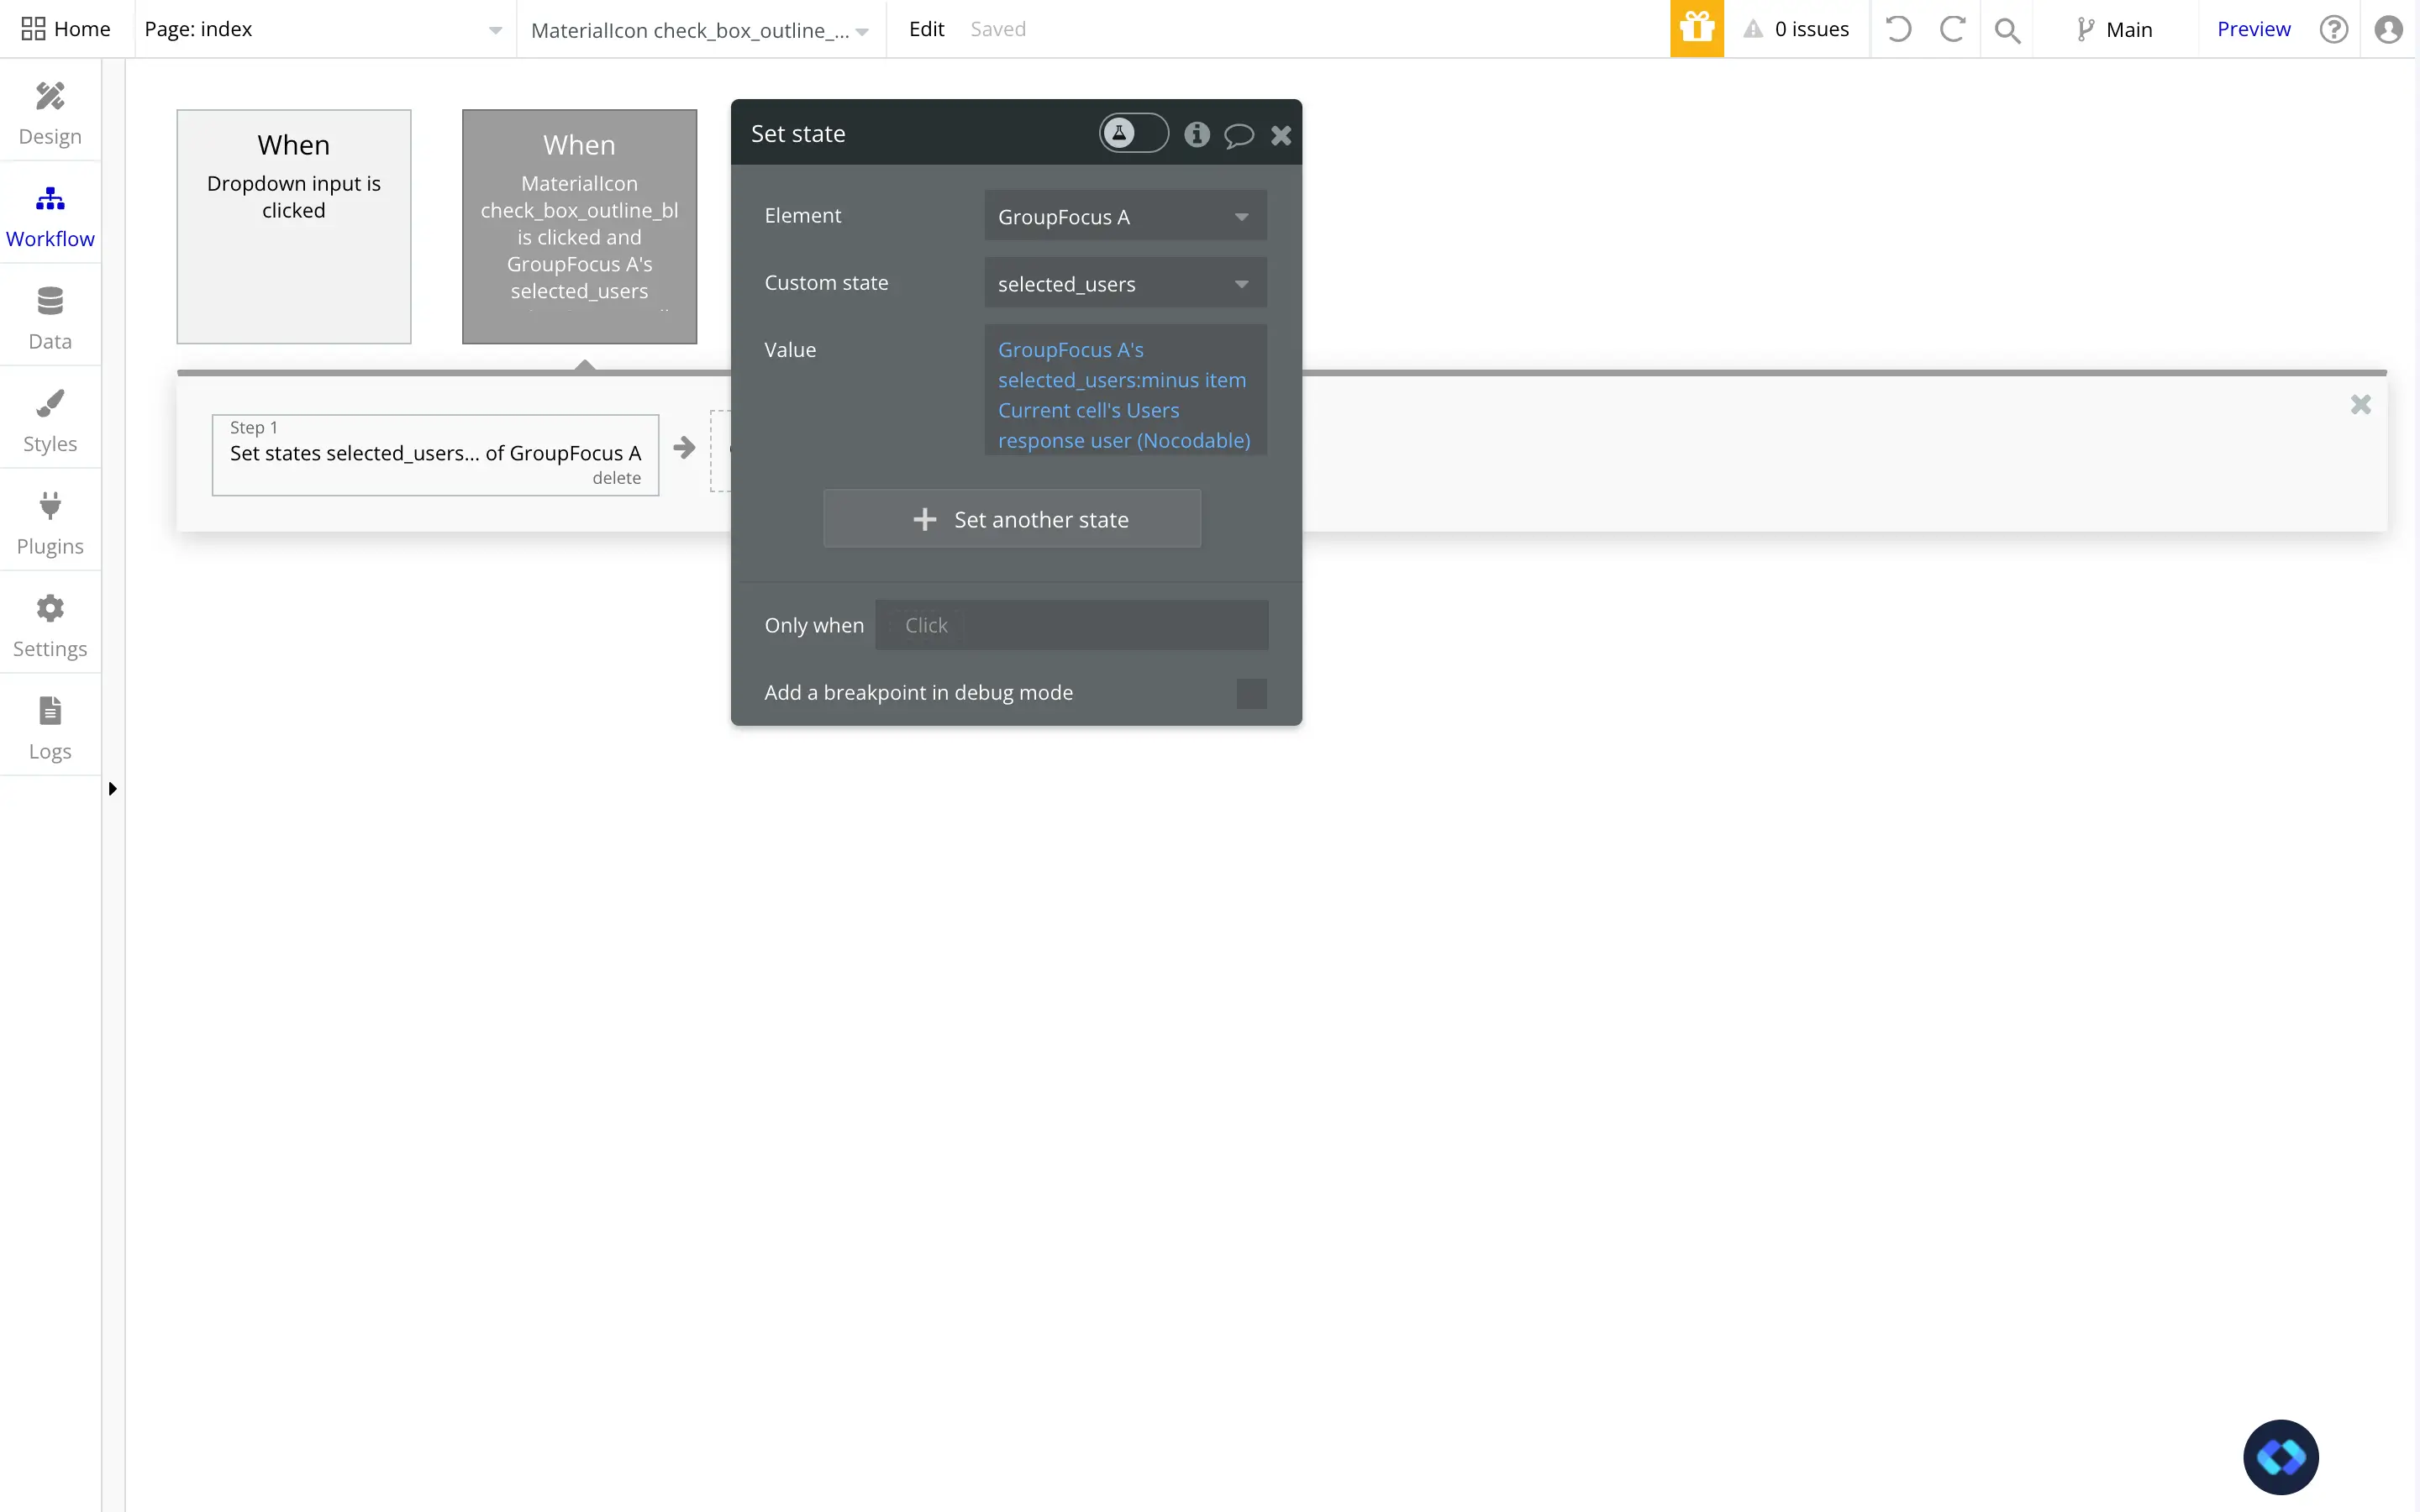
And now we simply have to update our Custom State and remove the Current Cell's User.
To do this, instead of the :plusitem operator we used earlier, we will use the :minusitem operator.
And there we go, our Workflow are set up !
Changing the appearance of our Checkboxes
Now we need to do one last thing related to our list of users, which is to change the color of our checkboxes when a User is already selected.
This is very important as it will help us know which User are selected or not.
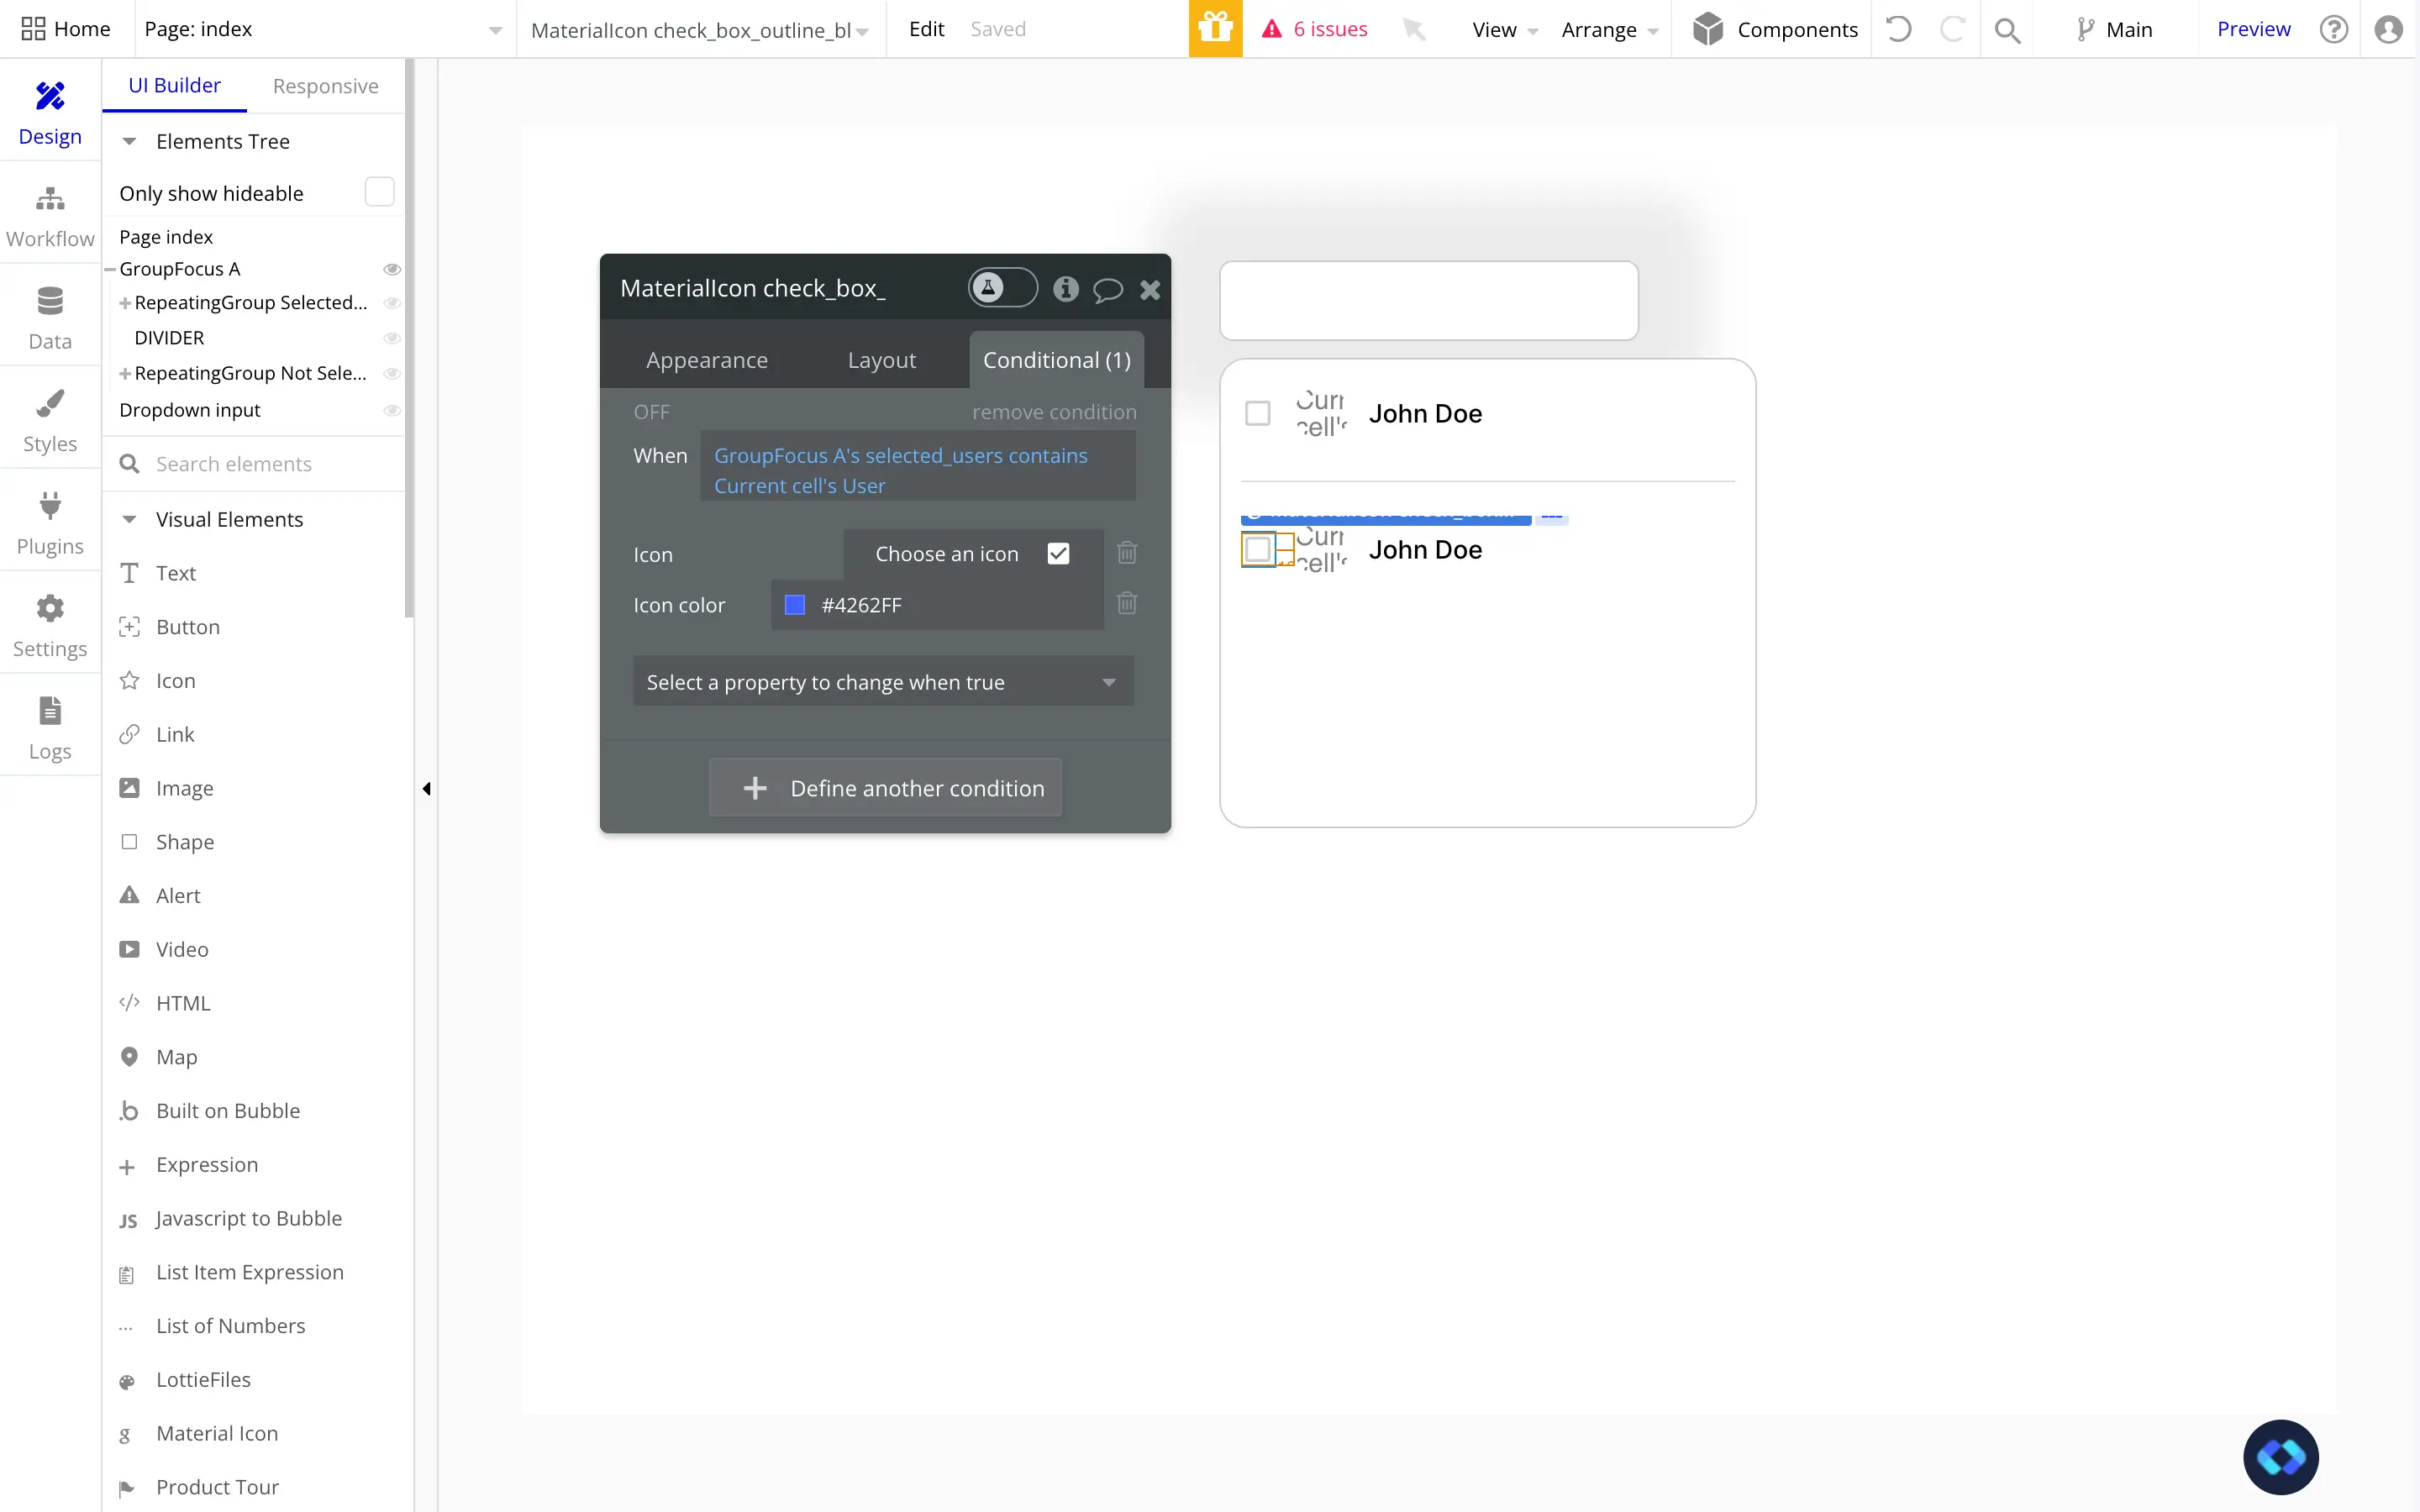
To do this, you will simply need to add the condition shown in the screenshot above ☝️
In short, it verifies if the user is present in our Custom States, and if it is, then it changes the Icon as well as its color.
Note : I'm not using a native Checkbox element, but an Icon. This allows us more flexibility and possibilities.
If we hit preview, here's what we get !
Pretty nice, right ?
Adding tags to our Multiselect Dropdown
Now, obviously, it wouldn't be a complete Multiselect Dropdown if we don't have a tag system (as shown in the picture earlier).
To do this, nothing too complicated, we simply need a third Repeating Group.
The role of this repeating group will be to show the list of items stored in our Custom State (in my case, Users).
So let's add this Repeating Group :
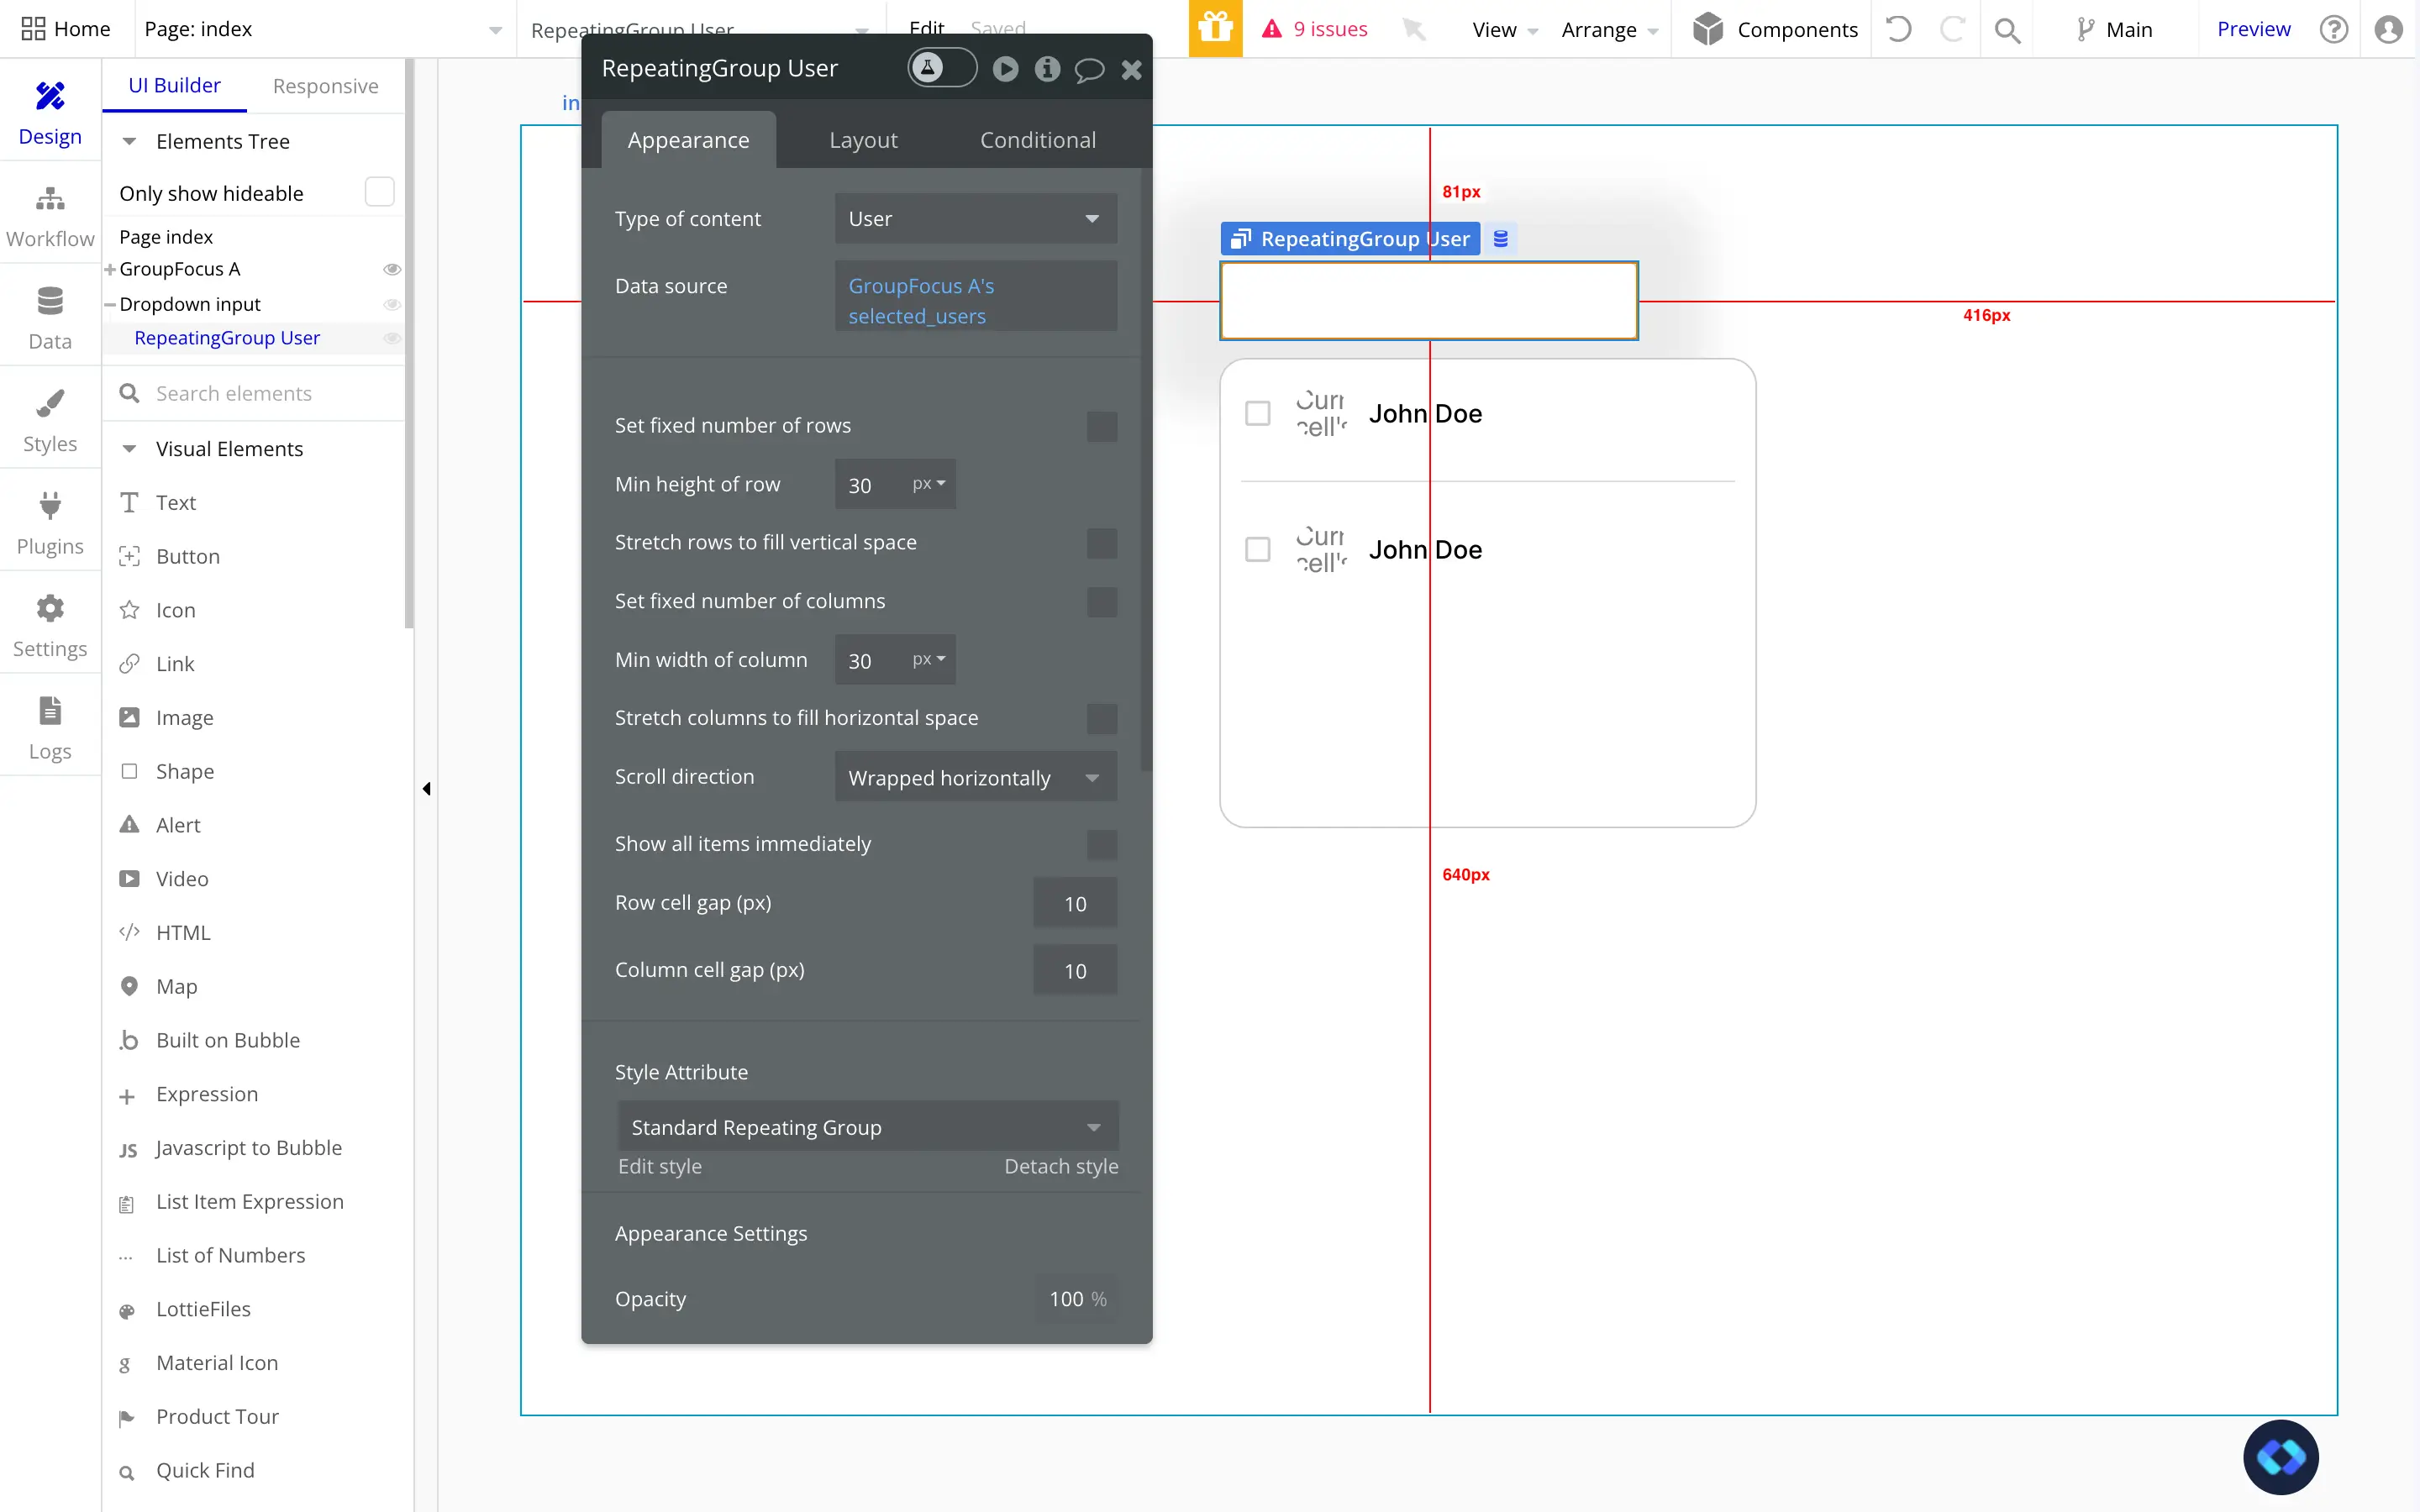
As you can see, I've unchecked the "Set fixed number of rows" and "Set fixed number of columns" and decrease the "Min Width" and "Min Height" values.
I also set the Scroll Direction to "Wrapped Horizontally". This will make our tags automatically adapt their position based on their number, this is very important.
Now I simply need to design a simple Tag with a Group and set it's content to the name of my users :
And there you go, here is our result !
We now have a fully functional and customizable Multiselect Dropdown.
And the best thing ? It cost us $0.
How amazing is that ?

Thomas Couderq
Founder @ Nocodable
I've been building with Bubble for more than four years now. I've launched several projects (with more or less success). I'm passionate about no code and UI Design, which led me to founding Nocodable Components to help founders and professional Bubble developers build faster on Bubble.
Find me on Linkedin